# Platform Tour
With Rezonate, security teams can achieve many supporting values around Identities, privileges, behavioral profiles, and Risks. In this short guide, we will review the different sections of the platform and the use cases around them.
To learn more, select one of the items below :man\_student:
# Platform Dashboard
### The Main Dashboard
The platform's main dashboard is the first thing that we can see after logging in to Rezonate. This dashboard shares an overview of the integrated environment, including pivotable links to different areas in the platform. the information that we can understand in the dashboard is the following:
* Overview of the integrated environment, including high-level metrics of users and assets. Clicking on an asset (such as AWS Users) will pivot to the relevant page in-platform for details.
* Posture Stats - High-level statistics of some of the highlighted risks (such as Dormant Identities or MFA Issues)
* User Access Types - High-level counters for privileged identities, external users, and other useful information.
* Security Exposures - Aggregated information, by risk category that shows the different issues (exposures) that were detected in the environment. In addition, the OPEN VS RESOLVED widget provides additional context on the risks that were detected or fixed over time.
* Activity - a live feed of things that happened, including the creation of highlighted assets, and changes in the risk
Rezonate Main Dashboard, Screenshot.
###
# Identity Analytics
One of the main components of the platform. The identity analytic area shows information about Identities and assets that are integrated into Rezonate, based on the integrations that were connected to the platform. Rezonate presents those identities in 2 different modes, based on the use case:
[Identity Centric](/platform-tour/identity-analytics/identity-centric) - A unified view that aggregates different identities among platforms.
[Identity By Platform](/platform-tour/identity-analytics/identity-by-platform) - A split view that shows identities and assets sliced by an integrated platform.
# Identity Centric
The Identity centric is a 2-page section that presents aggregated, cross-platform information about the identities and the access that they have to the environment.
{% hint style="info" %}
For this mode to be unlocked, at least 2 integrations must be connected to Rezonate.
{% endhint %}
Identity Analytics Section
### **Human Identities**
a unified view of all of the Human identities, that exist across the different platforms. Rezonate, through its Authorization graph (Identity Storyline), aggregates the different sub-identities associated with each Identity, into 1 unified entity that has attributes, access path, and Risk.
From this view, it's possible to query and ask questions such as:
* Show me all of the users who have access to specific applications
* Show me all of the identities who have high privileges in at least one platform
* Show me all of the identities who have no HR-related record, or are marked as offboarded.
**Selecting an identity we will open a drawer with 3 tabs:**
**Properties** - A summarized information about the identity, including associated emails, names, and other useful information collected across the board. for example -when selecting Michael Scott's identity we will see that he's known by a few names such as Michael Scott, ScottTrexony, and others. We can also see the creation date of the identity and note that he last signed in 3 days ago.
Michael Scott Entity Properties
By Clicking the Devices, we can also see all of the Registered Mobile or endpoint devices that he ever used to operate in the environment. clicking on them will show additional information, such as device-state, and serial numbers.
Michael Scott Devices View
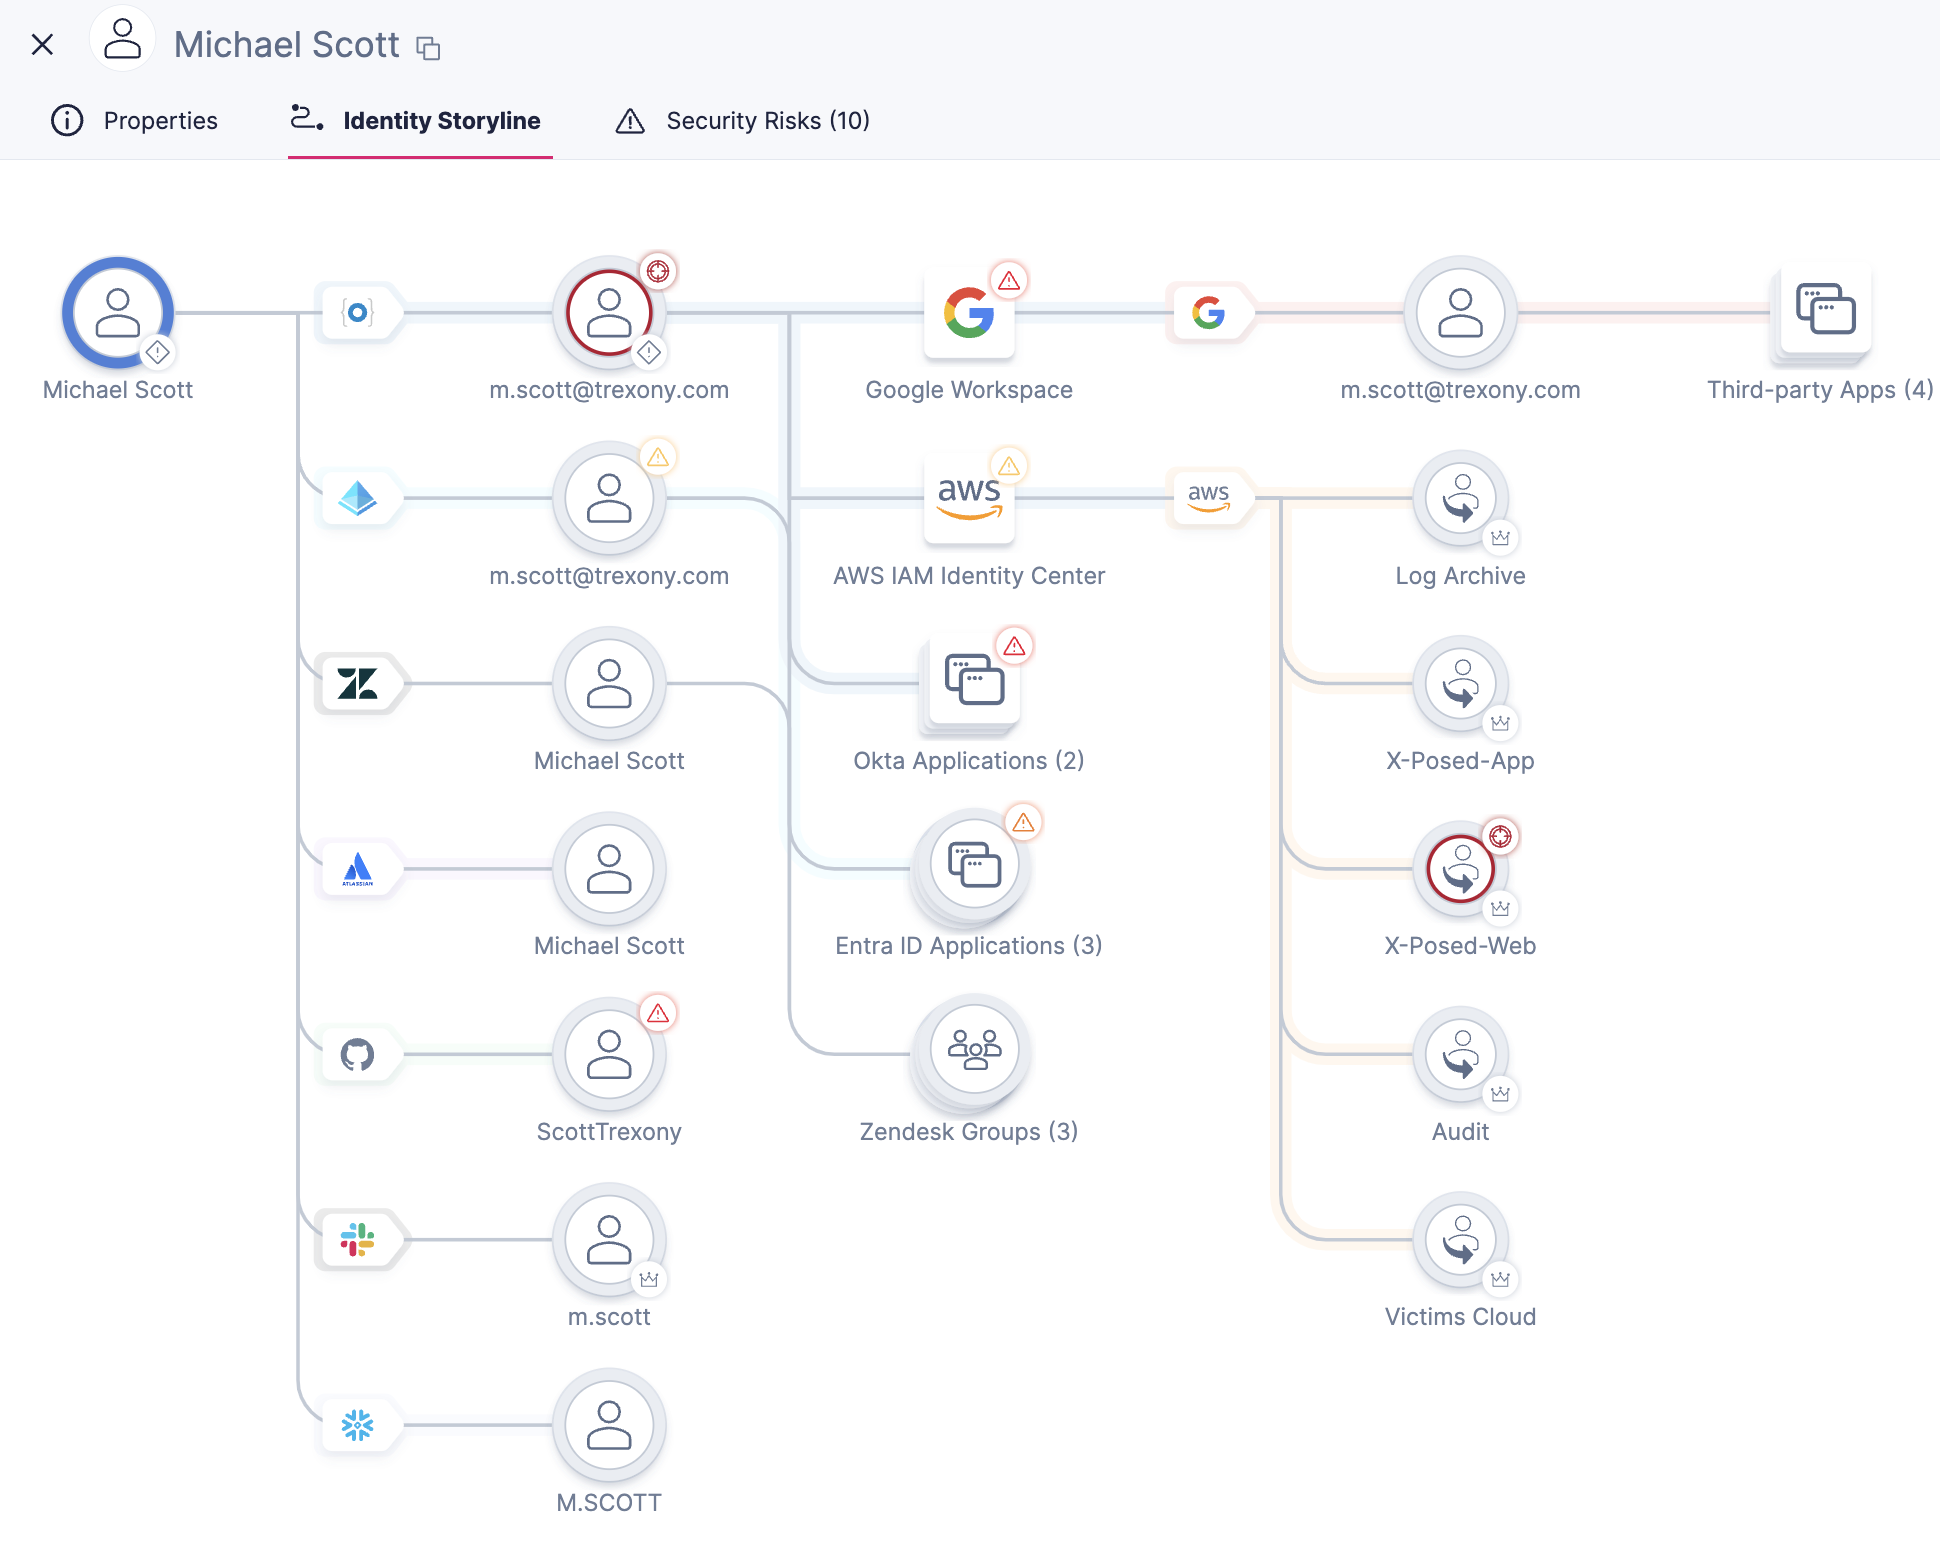
**Identity Storyline -** A Visual Representation that describes the access that the identity has to the environment, taking into consideration federated access, and tenant configurations. \
\
for example, below we can see that Michael has access to a **Google** **Workspace** account through **Okta** and that he has federated access to **5 AWS Accounts**, managed through **EntraID** SSO. we can also that Michael has access to additional products such as GitHub, Snowflake, and others.
Michael Storyline view
By Selecting an item on the graph, we can View his storyline and deep-dive into his access path, or alternatively, we can View entity details to see expanded properties, privileges, and activity information
**Security Risks -** an aggregated risks & threats view for Michael Scott entities, including their risk-level, status, and ability to drill down for more information.
***
### **Non-Human Identities (NHI's)**
A unified view of all of the Non-human identities, that exist across the different platforms. Rezonate Aggregate those identities by general type according to the following categories:
* Access Keys
* Service Accounts
* Access Tokens
* IAM Roles
By selecting a category we will see the different entities associated with it, including their risk level, number of identities, and associated accounts. by clicking a row we can pivot to the relevant entity page for more information.
NHI Section
# Identity By Platform
The Identity-by-platform view is more of a traditional way of looking into identities and assets.\
In this mode, whenever an integration is being added to Rezonate, a new section will appear in the menu, which will show the most relevant identities & assets that are associated with it.
**For Example:**
After integrating AWS we will find an **AWS** menu item. clicking on it will show a submenu with Users, Groups, Roles, Policies, Access Keys, Activity Logs, and other useful data points, focused completely on AWS.
Clicking on AWS Menu item after integration, Rezonate
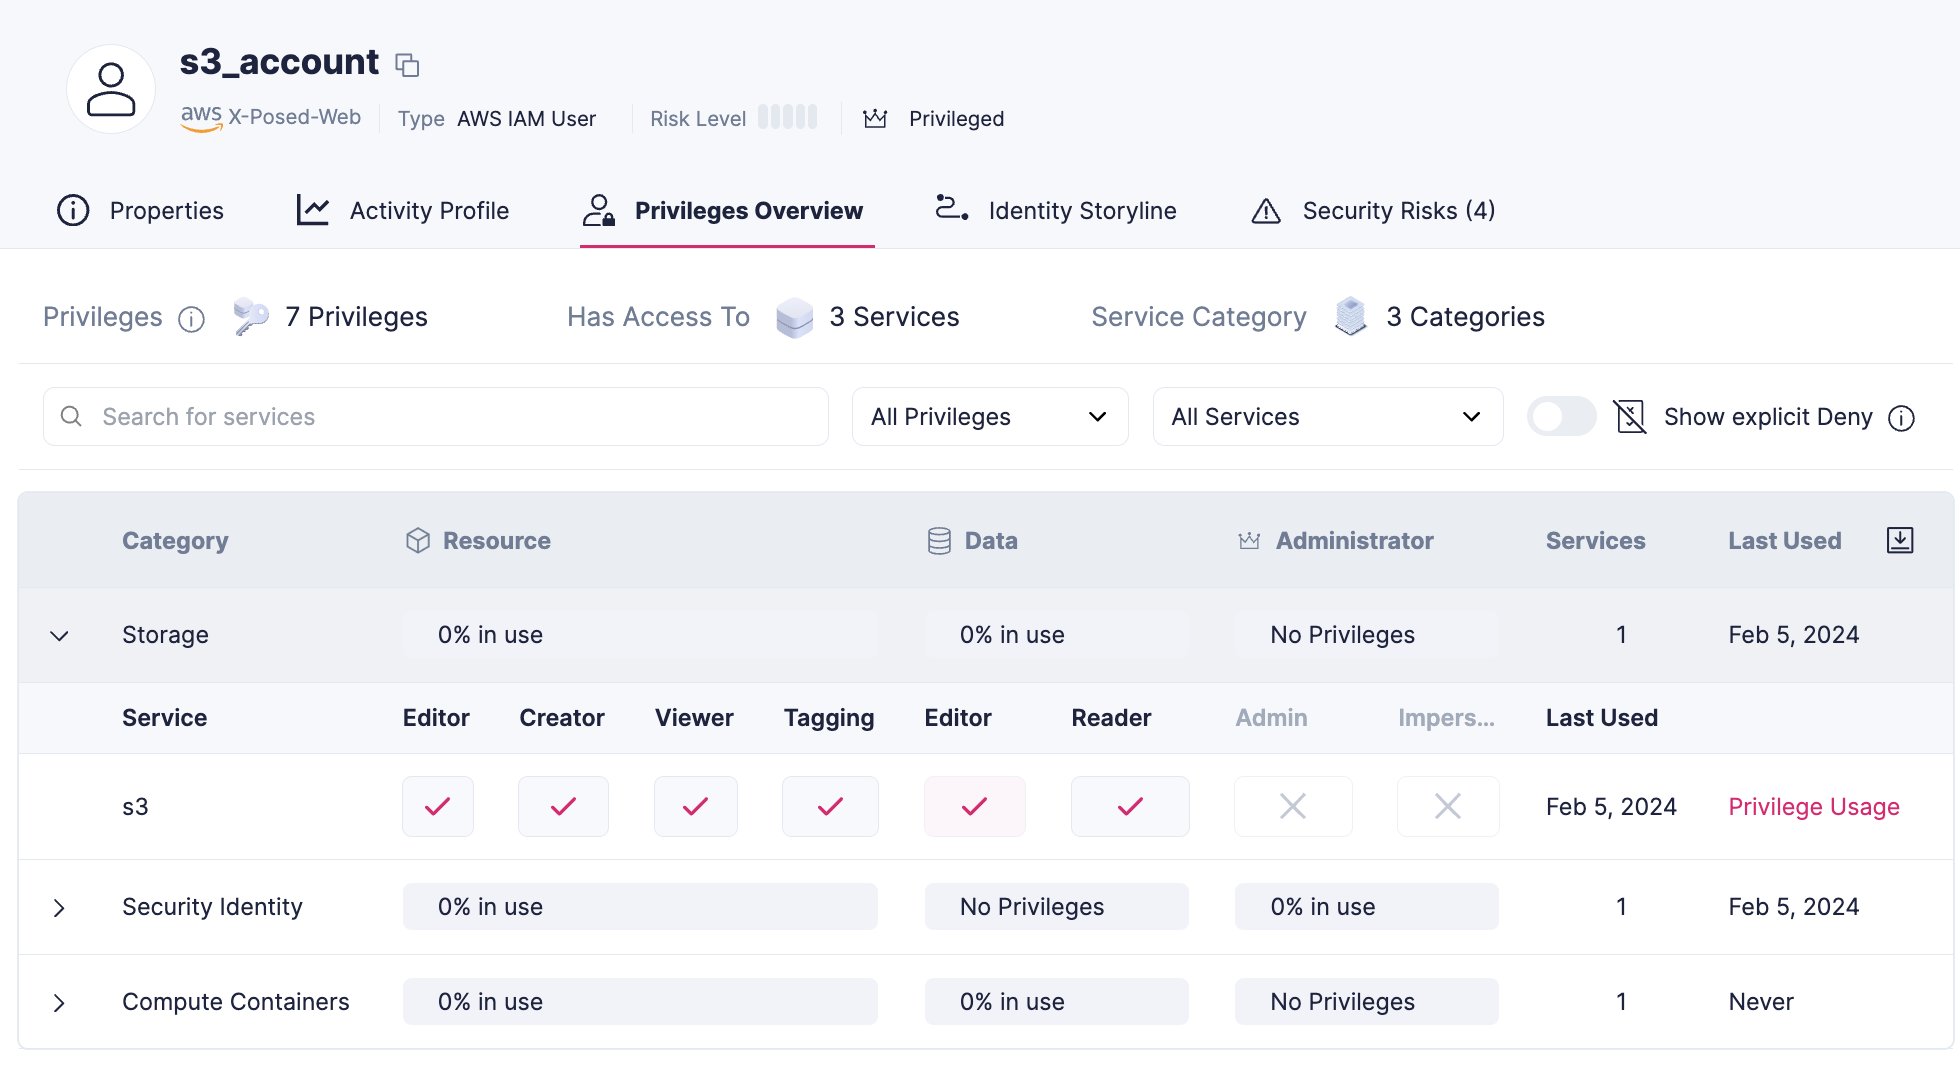
Clicking on each Row in the table will reveal additional information, dedicated to the identity, such as Privileges information, Behavioral Profile, and more, based on the supported features within the integration.
***
**Example - AWS User drildown**
# Risks & Threats
The Risks & Threats area is in a security-focused perspective to examine the identities and their posture issues, as well as potential threats.
In this area, we can find a few different views:
1. **Exposures** - Security Posture Issues & As well as remediation solutions (in product or external).
2. **Threats** - Identity Threats that were detected in the environment.
3. **Access Review -** A lean way to review who has access to something, and manage the reviewing lifecycle to comply with regulations and government policies.
4. **Compliance** - a compliance perspective including the current status of the environment when being measured against NIST, SOC, and other frameworks.
Risk & Threat Area, Rezonate
***
### Exposures
Rezonate checks hundreds of security controls that can be customized based on the organization's preferences. the findings and their lifecycle can be found under the Exposures page which includes everything that is needed to quickly understand and remediate a risk.
On this page, we can review the different risks that were found in the environment, slices by category, and with agile filtering capabilities to filter by area, platforms, or detection time.
By clicking on each exposure we can see a list of identities that suffer from it, including their risk level, which may be affected by the blast radius of the specific identity or other attributes to help with the prioritization process.
Example for Risk Drildown - MFA Issues for EntraID users
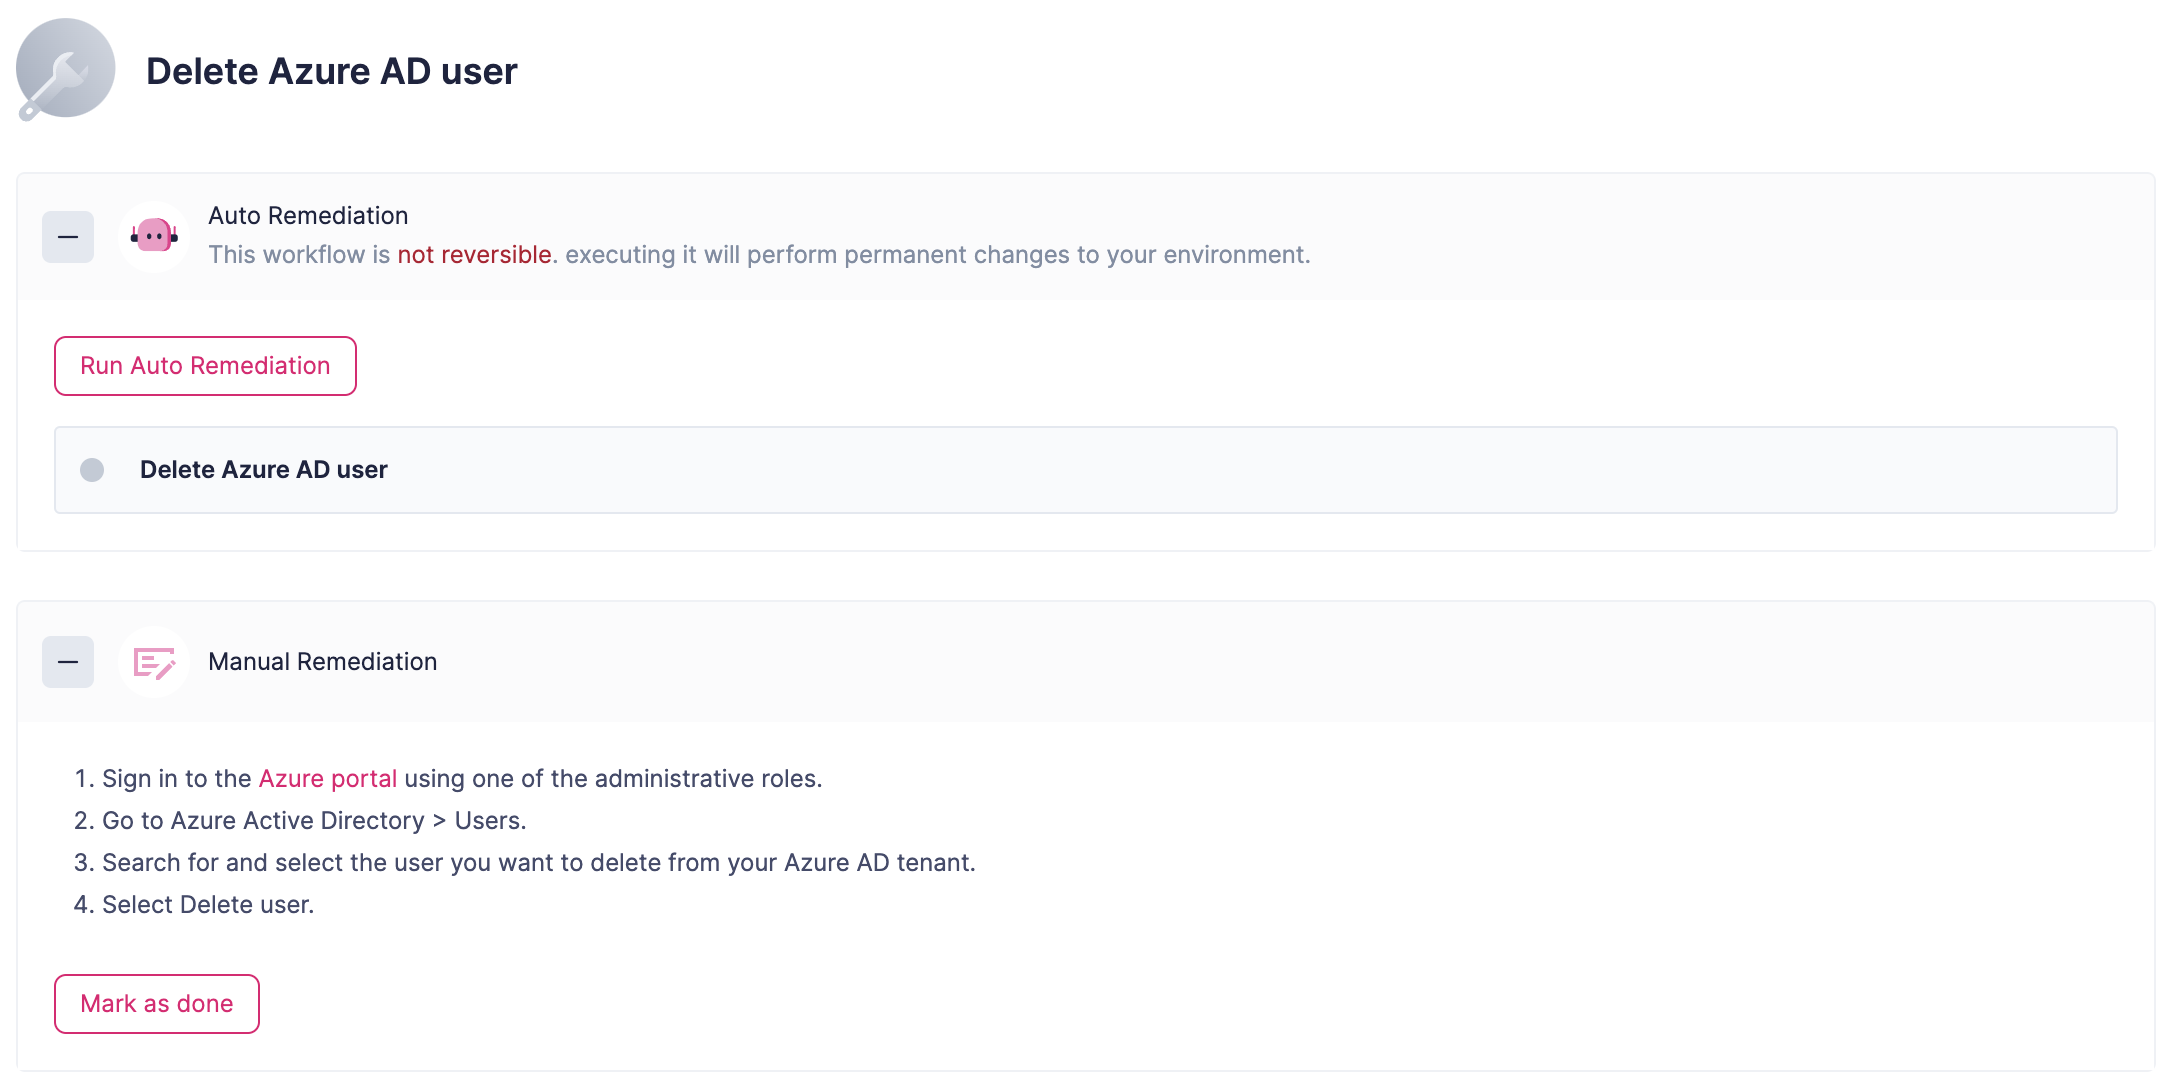
By Clicking an issue, we can see the full information, including its Identity storyline as well as potential remediations (that can be applied automatically from Rezonate or externally)
Issue Details
It is also possible to create Jira issues to manage the process of remediating these issues externally through a seamless integration, by clicking the Create Issue button.
Remediation for the detected Risk
# Highlighted ITDR Capabilities
#### In the face of evolving cyber threats, traditional security measures often fall short in protecting identity-driven environments. Rezonate’s ITDR capabilities are engineered to address this gap, providing a powerful, proactive defense across every stage of the MITRE ATT\&CK kill chain. Below are some highlighted threat scenarios that our ITDR module is capable of detecting
#### Initial Access
* Suspicious Console and Interactive Logins: Unusual or unauthorized login attempts, especially from new devices or unfamiliar locations.
* Brute Force and Distributed Brute Force Attacks: Repeated attempts to guess passwords or roles to gain unauthorized access, often using automated tools.
* Password Spray Attacks: Attackers use a common password across multiple accounts, hoping to find accounts with weak or reused credentials.
* MFA Fatigue: Overwhelming users with multiple MFA prompts to trick them into approving an unauthorized access attempt.
* Access via Tor and Proxy Networks: Using anonymizing services to mask IPs and obscure the attack’s origin, bypassing location-based security restrictions.
* Use of Legacy Protocols: Exploiting older, less secure protocols that lack modern protections like MFA.
* Login with Scripting Tools: Initial access attempts via scripting languages or command-line tools, signaling potential automation or unauthorized access.
#### Reconnaissance
* Enumeration of Resources: Attackers explore resources such as policies, roles, storage services, computing services, or code pipelines to gather information on the environment, looking for privileged resources or vulnerabilities.
* Enumeration of Security Services: Assessing the configuration of security tools like monitoring and logging solutions, looking for gaps or exploitable configurations.
#### Persistence
* Creation of Administrative Accounts and Credentials: Establishing persistence by creating high-privilege accounts or generating new access keys.
* MFA Enrollment and Deletion: Modifying MFA settings to secure persistent access, such as enrolling a new MFA method or removing existing ones.
* Conditional Access and Policy Manipulation: Updating conditional access policies to allow easier reentry or prevent detection of the compromised identity.
* Session Hijacking and Token Creation: Attackers create or hijack session tokens, bypassing traditional authentication mechanisms and allowing long-term access without direct logins.
* Service Principal and Application Credential Addition: Adding service principal accounts or applications with permissions, enabling attackers to bypass normal user logins and maintain access.
* Resetting Security Information: Changing security settings, such as recovery emails or authentication factors, to maintain exclusive control over a compromised account.
* Adding External Identity Providers: Configuring additional IDPs to allow unauthorized external accounts to authenticate as legitimate users.
#### Privilege Escalation
* Role and Group Modifications: Elevating privileges by adding compromised accounts to privileged roles or groups, granting unauthorized access to sensitive resources.
* Privileged Identity Management (PIM) Role Escalation: Exploiting PIM processes to temporarily or permanently add accounts to high-privilege roles.
* Consent Grants to Malicious Applications: Granting admin consent to applications, which then have persistent, elevated access to the environment.
* Adding or Updating Conditional Policies: Modifying policies to escalate privileges, such as granting new permissions, application access, or relaxing security policies for targeted users or groups.
* Service Principal and App Role Assignment: Assigning roles to applications or service principals to expand the scope of privileges without using user accounts.
* Owner and Administrator Privilege Changes: Assigning ownership or administrator privileges to accounts or applications, ensuring access to high-value resources.
#### Defense Evasion
* Disabling Monitoring and Logging Services: Disabling security services like logging, threat detection, or monitoring tools to preventthe detection of malicious activity.
* Modifying Security Policies to Avoid Detection: Updating access policies or security configurations to avoid triggering alerts, such as setting permissions that bypass standard protections.
#### Exfiltration
* Making Storage Public: Configuring storage buckets to allow public access, enabling the attacker to extract data without authorization.
* Cross-Tenant Sharing of Resources: Sharing resources, like snapshots or databases, across tenants or accounts, often to transfer data out of a secure environment.
* Creating External Data Shares: Establishing data shares with external entities, allowing unauthorized parties to access data continuously.
* High-Volume Queries for Data Exfiltration: Running large queries on databases to extract significant volumes of data in a short time, often unnoticed in high-traffic environments.
#### Impact
* Resource Creation and Manipulation: Creating or altering resources (e.g., compute instances, containers, or functions) to carry out malicious operations in the victims' environments.
* Mass Resource Deletion: Removing resources in large volumes to disrupt operations or hinder forensic investigations, typically seen in destructive attacks.
* Backup Data Corruption: Tampering with backup data to prevent recovery in the event of a successful attack.
* Malicious File or Script Execution: Executing unauthorized files or scripts on cloud instances or containers, potentially installing malware or manipulating data.
#### Lateral Movement
* Federated Identity Access across Services: Using federated identities to access other services, such as cloud platforms or code repositories, expanding the attacker’s reach.
* Cross-Account Role Assumption: Assuming roles in other accounts or tenants, allowing attackers to access resources in affiliated or partner environments.
# How-to Guides
# Adding Integrations
Adding new integrations to Rezonate enhances its functionality, enabling seamless connectivity with various tools. This ensures better data flow, improved user experience, and expanded capabilities for efficient workflows.
### How to Add New Integrations?
1. Login to the Rezonate console with a privileged user, and go to the [integrations](https://app.rezonate.io/settings/integrations) page.
2. Click the new Integration Button
3. Select Integration from the list. you can use the textbox for search or the categories to narrow down based on the type of integration or values.
4. Fill out the form as required based on the integration that is being connected
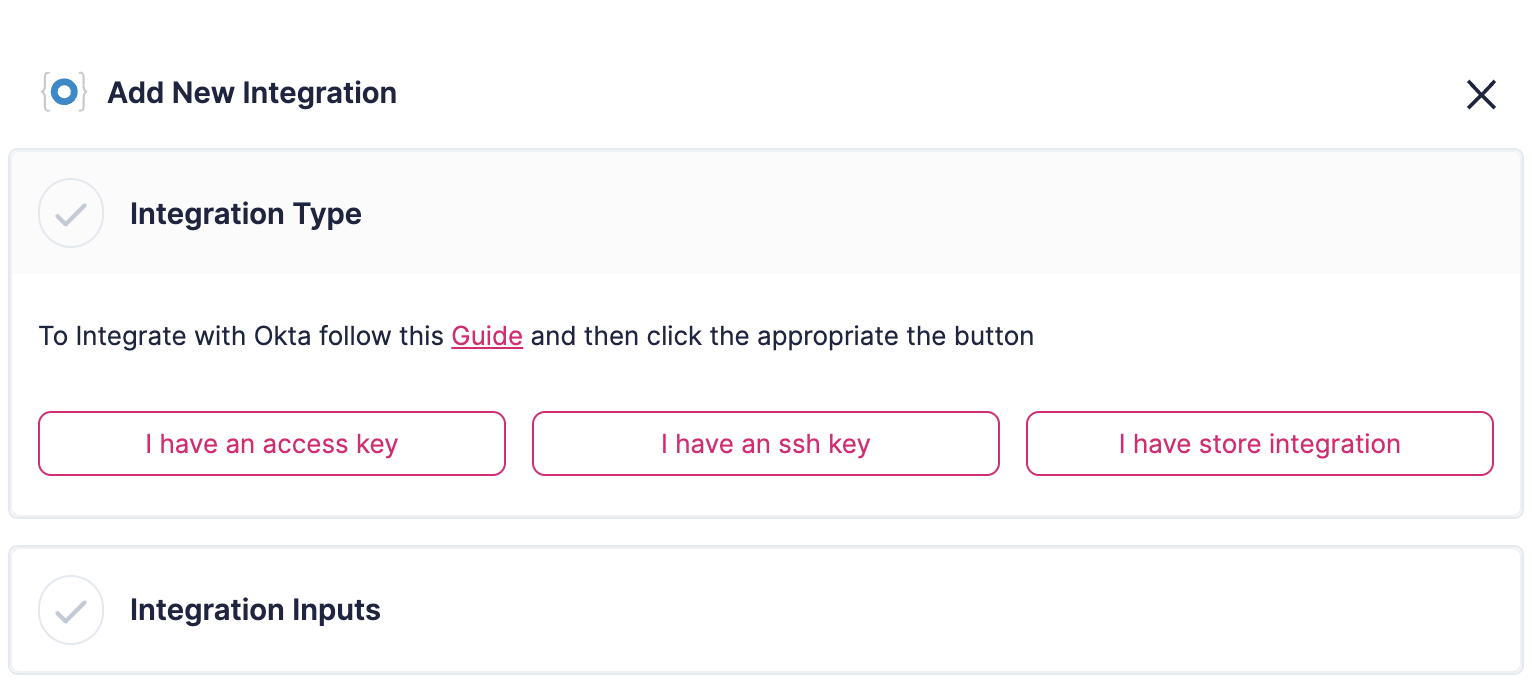
Example - Okta Integration
Thats it! :)
# Manage Users
**User management** in Rezonate provides three access levels: **Read**, **Edit**, and **Owner**.
Owners can manage other users and control access settings. \
You can limit user access to specific accounts, ensuring they only see relevant information. Additionally, Remediation access can be enabled, allowing users to fix issues within their scope. \
This system ensures users have the right permissions, enhancing security and streamlining workflows within the platform.
### Inviting users to Rezonate
1. Browse to the user management area and click on the Invite.
2. Fill in the Email, the allowed authentication method, and the scope of accounts.
3. Select the Primary role, and decide if to grant Remediation capabilities.
4. Click the Invite button. and thats it! :)
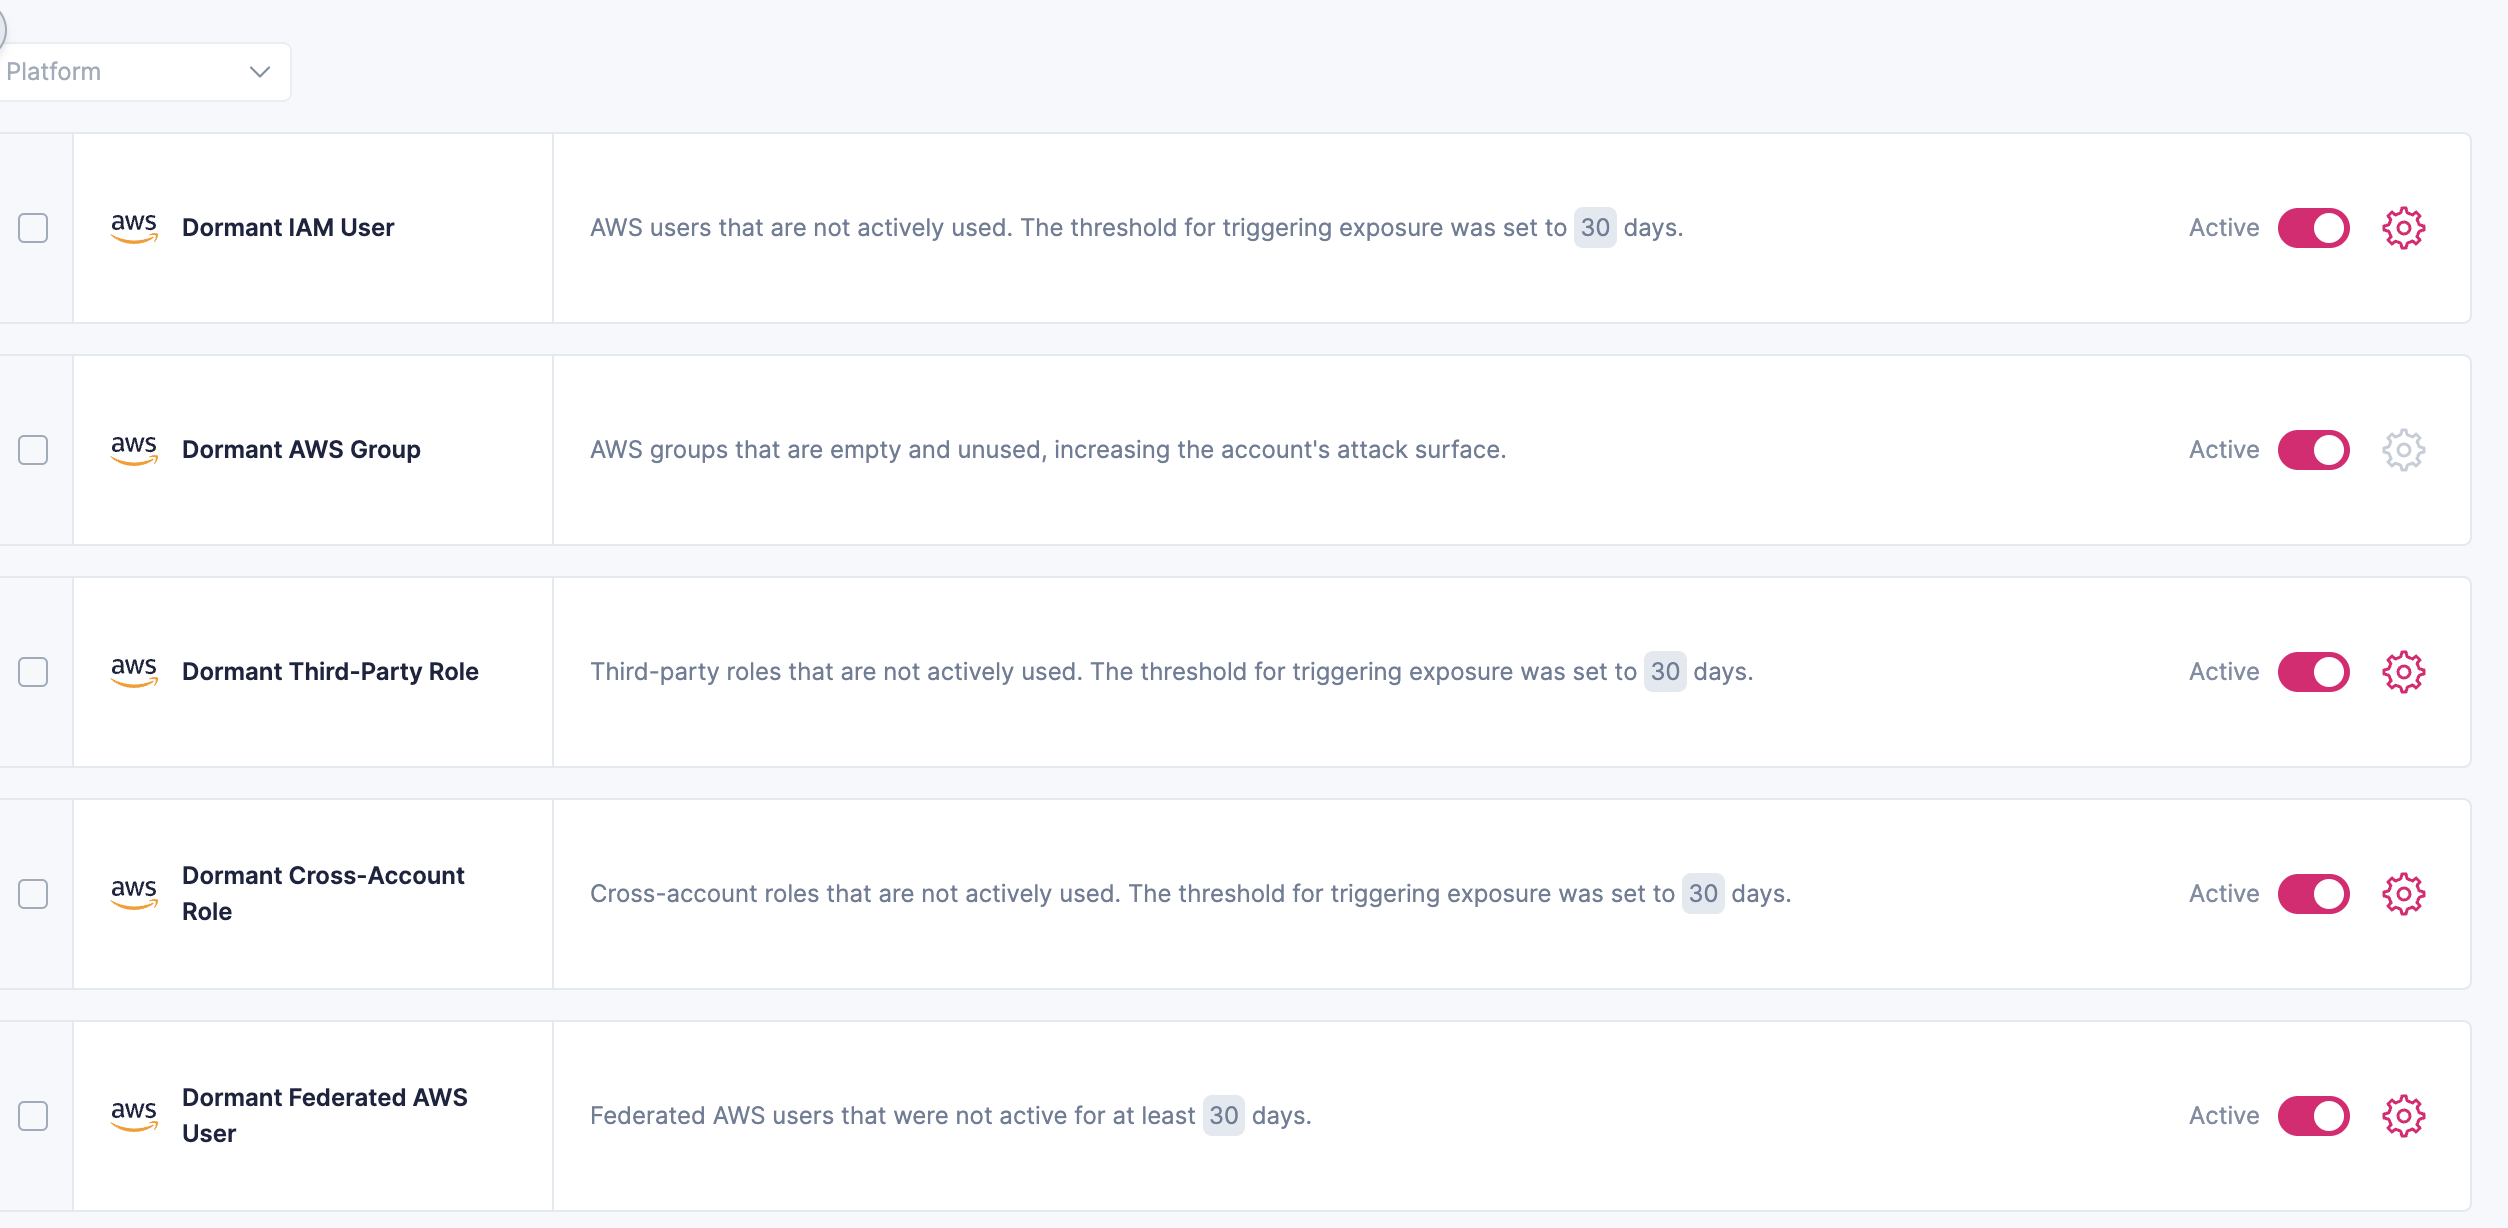
# Customize Exposures
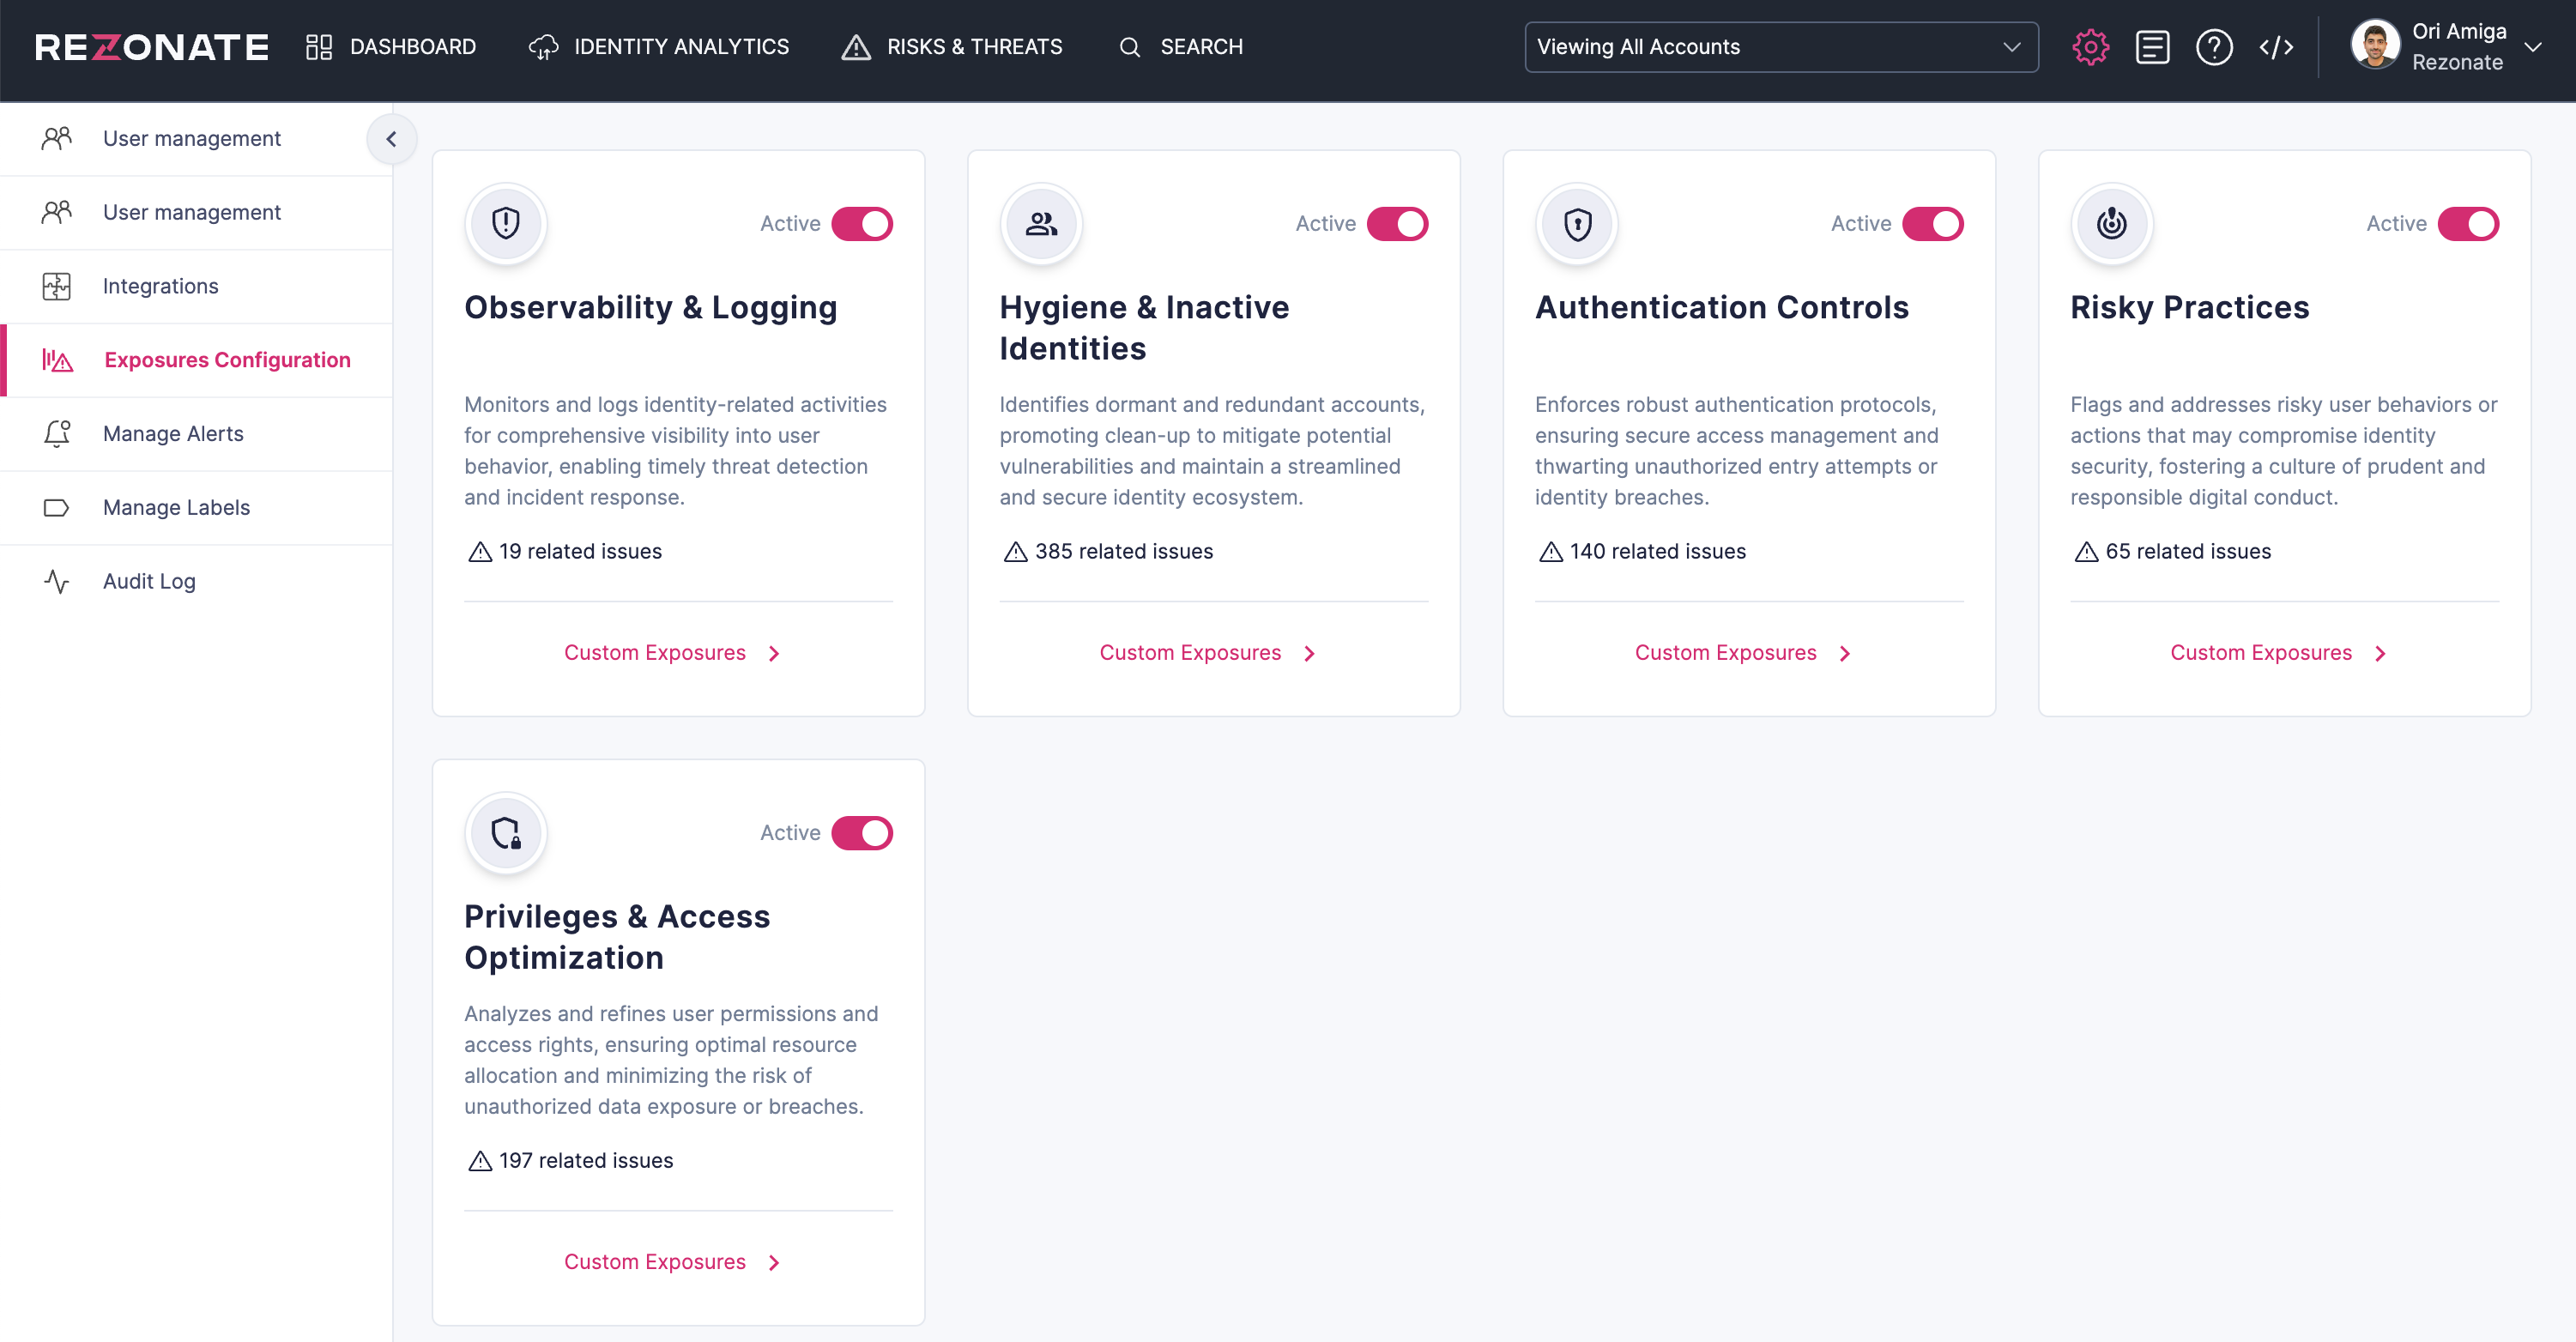
**Exposures Configuration** lets users customize security controls to be monitored.
You can set different thresholds for each exposure, tailoring the sensitivity to your needs. \
Additionally, users have the option to disable certain exposures entirely. \
\
This flexibility ensures that the monitoring system aligns with your specific security requirements, providing a tailored and effective approach to maintaining security within the platform.
### How to Configure Exposures
1. Browse to the settings panel, signed in as a privileged user
2. Click the Exposure Configuration button.
3. Select Category, and change the settings per exposure of for the entire category all at once.
overview of categories in the configuration area
Modifing the security controls, per category
Clicking the Edit button and tuning threshold for a control
# Querying & Filtering Data
Rezonate has advanced query builder capabilities that allow filtering and sorting for all of the data that is being collected from different integrated platforms. This capability is supported across the entire product through the filters & search boxes that are placed above any table.
Query Builder example, Azure users page
For example, if we are looking for all of the enabled user accounts with global admin directory roles who were active in the last week, we can write something like this:
Query Builder Example #1
\
The Query builder has many operators that can be used, below is a detailed list of them and their purpose:
Example for Query term
### Text Operators
Operator
Purpose
Example
starts with
Search for any text that starts with a specific text. (Insensitive)
Find all users whose name starts with Or (Will result in Ori, Oran, etc..)
contains
Search for any text that contains a specific text (Insensitive)
Find all users whose name contains Or (Will result in Ori, Oran, Lior, etc..)
not contains
Search for any text that not contains a specific pattern
Find all users whose names do not contain ABC.
equals
Search for any equal text (case-sensitive) to a specific text
Find all users with a first name equal to Ori.
not equals
Search for any text that is not equal (case-sensitive) to a specific text
Find all users with first names not equal to Ori.
Example for Query term
### Date Operators
Operator
Purpose
Example
last
Search for dates that occurred within the selected relative date.
Find all users whose last login was within the last week.
before-last
Search for dates that occurred before the selected relative date.
Find all users whose last login was before the last week.
before
Search for dates that occurred before the selected date
Find all users whose last login was before 1/1/2024
after
Search for dates that occurred after the selected date
Find all users whose last login was after 1/1/2024
{% hint style="success" %}
Pro Tip! - When saving searches in the query catalog, its always preferred to use relative date operators such as last or before-last.
{% endhint %}
### Boolean Operators
Operator
Purpose
Example
is
Find a matching value for the boolean
Find all users with enabled account. (Enabled is true)
### Number Operators
Operator
Purpose
Example
Bigger Than
Find records with a number bigger than the searched input
Find all users with age>10
Smaller Than
Find records with a number smaller than the searched input
Find all users with age<10
Equals
Find records with a number equal to a selected input
Find all users with age=10
Not Equals
Find records with a number not equal to a selected input
Find all users with age!=10
### Filters Combinations
When combining **multiple filters** on the **same** **field**, the resulting query term would apply **AND** criteria between them. this means that when searching for Name contains "Ori" and Name contains "Levy" the compiled search would be
```
Name contains "Ori" AND Name contains "Levy"
```
#### Special Cases
Although the regular behavior, when combining multiple **Equals** filters on the same field, Rezonate will compile them with **OR** Operator. this means that when searching for Name equals "Ori", and Name equals "Ron" the compiled search would be
```
Name equals "Ori" OR Name equals "Ron"
```
# Core Integrations
# Azure Integration
This document describes how to integrate the Rezonate product with the Azure Active Directory and Azure Subscriptions. The integration also covers M365 and Intune.
### Step 1 - Creating an Application
1. Browse to the Azure Active Directory [user portal](https://portal.azure.com/#view/Microsoft_AAD_IAM/ActiveDirectoryMenuBlade/~/Overview).
2. Select “Enterprise Applications” in the side menu\

3. Click “New Application”.\

4. Select “Create your own”.\

5. In the new Application name, write “**Rezonate**” and then click Create.
6. After the creation process is complete, you will be redirected to the application page.
7. Click the Permissions tab on the side menu.
8. Select “Application registration”.
### Step 2 - Granting Access to Azure AD + M365
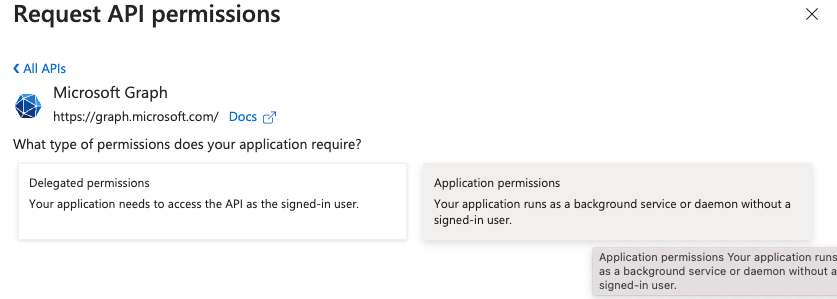
1. Select “Add Permissions” and select Microsoft Graph, and then **Application permissions.**
1. Add the following read-only permissions for the application to acquire all relevant data:
TeamMember.Read.All\
UserAuthenticationMethod.Read.All\
Policy.Read.PermissionGrant\
IdentityRiskyServicePrincipal.Read.All\
Channel.ReadBasic.All\
SecurityAlert.Read.All\
MailboxSettings.Read\
Directory.Read.All\
ReportSettings.Read.All\
RoleManagement.Read.All\
IdentityProvider.Read.All\
IdentityRiskyUser.Read.All\
IdentityRiskEvent.Read.All\
AuditLog.Read.All\
Policy.Read.All\
Member.Read.Hidden\
Reports.Read.All\
DirectoryRecommendations.Read.All
After selecting the permissions, Click **Add Permissions**.
6. Click “Grant Admin Consent for Rezonate” and then “Yes”.
7. Select “Certificates & secrets” in the side menu.
8. Select “Upload certificate”.
9. Add the rezonate\_aad\_azure.crt file from Rezonate. (Attached in this article)
10. Click the Overview button.\
11. **Please copy and bring back the following items:**
1. Application (client) ID
2. Directory (tenant) ID
### Step 3 (for Azure Integration) - Granting Access to Azure Management Group
1. Head over to the Management Groups screen, and choose the Tenant Root Group.
2. Select Access Control (IAM) from the left-side bar.\
3. Select “Role Assignments”, then “Add”, and then “Add role assignment”.
4. Select “Job Function Roles”, and head over to the Role tab.
5. In this tab, select “**Reader**” and then “Next”.
6. You will be moved to the “Members” page, to add members to the assignment.
7. Click “+ Select Members” and enter the application name created in step 1 - “Rezonate”. You will see the application in the right-side menu, click it and then click “Select”.
8. You should now see the application in the Members box. Click “Review + Assign” to finish the process.
9. You should now see the application is assigned the “Reader” role, listed in the “Role assignments” screen.
10. Head over to the overview screen of the subscription to find the ID.
11. **Please copy and bring back the following items:**
1. Subscription ID numbers to cover.
2. Tenant ID.
{% file src="/files/V2NCOK7UGwkHsLCkHQjd" %}
# Required Privilegees
### Read Only Integration
For the integration to operate properly, the following **read-only** privileges are required
Permission
Description
TeamMember.Read.All
List team members
IdentityRiskEvent.Read.All
List identity risk events
AuditLog.Read.All
Read Audit Log
Policy.Read.All
Read Policies
Member.Read.Hidden
List Members
Reports.Read.All
List Reports
Application.Read.All
List Applications
DirectoryRecommendations.Read.All
List Directory Recommendadtions
Organization.Read.All
Read Organization Info
IdentityRiskyUser.Read.All
Read Identity Risks
UserAuthenticationMethod.Read.All
List User Auth Methods
TeamSettings.Read.All
List Team Settings
IdentityProvider.Read.All
List Identity Providers
GroupMember.Read.All
List Group Members
Domain.Read.All
List Domain
RoleManagement.Read.All
List Role Management
ReportSettings.Read.All
List Report Settings
User.Read.All
List Users
Directory.Read.All
List Directory
MailboxSettings.Read
List Mailbox Settings
AdministrativeUnit.Read.All
List Admin Units
Group.Read.All
List Groups
SecurityAlert.Read.All
List Security Alerts
Channel.ReadBasic.All
List Channels
IdentityRiskyServicePrincipal.Read.All
List Identity Risks
Policy.Read.PermissionGrant
List Policies
### Read-Write Integration
{% hint style="info" %}
The Required Privileges are in addition to the read-only permissions to enable response & remediation actions
{% endhint %}
Permission
Description
User.ReadWrite.All
Allows the app to read and update user profiles without a signed-in user.
User.ManageIdentities.All
Allows the app to read, update, and delete identities that are associated with a user's account, without a signed-in user. This controls the identities users can sign in with.
# Update Certificate for Existing Installation
{% hint style="info" %}
The following document is relevant to customers that integrated Rezonate's EntraID (Azure) Integration before January 1st 2025.
{% endhint %}
1. Access the Azure Portal - Log in to the [Azure Portal](https://portal.azure.com/) using your administrator account.
2. Navigate to the Application Registration:
* In the Azure Portal, search for "App registrations" in the top search bar.
* Select the application registration associated with Rezonate.
3. Go to the Certificates and Secrets Section:
* In the application’s left-hand menu, click on "Certificates & secrets".
4. Upload the New Certificate:
* Click on "Upload certificate".
* Select the new certificate file provided (in .crt format) and upload it.
* Confirm that the new certificate has been successfully added.
5. Verify Certificate Details:
* Check the uploaded certificate to ensure it has the correct thumbprint: B101F1CA75C95DDD35C1742F511B568EE4750C1E.
6. Inform Rezonate when done:
* Please let us know when you have completed the process above, so that we can confirm that the integration update process was successfully executed.
{% file src="/files/GK2wh29rJnTGMpn4DxSd" %}
New Certificate for the integration
{% endfile %}
# Okta Integration
Integrating with Okta can give Rezonate complete visibility into assets, privileges, and activities. You can integrate with Okta by providing Rezonate with read-only access via an API Key or OAuth service. This document explains how to implement the OAuth method, which is considered more secure and cost-effective.
**There are 3 different, supported ways to integrate Rezonate with Okta, all explained in this document:**
1. By Generating an API Key
2. Through the Okta Marketplace
3. By Generating Custom SSH Key
##
## API Key Integration
### Method
For this method, a read-only administrative API key is needed. this can be generated from the admin console. after creating the key, save and insert the Okta domain & the API Key.
## Okta Store Integration
1. Sign in to your Okta Admin Panel, and select **API Service Integrations.**
2. In the integrations list, select Rezonate Security.
3. After reviewing the permissions click "Install & Authorize"
1. Take note of the application Client-id & Client-secret.
2. Login to the Rezonate Console, and click the settings button in the top menu
3. On the side menu, select Cloud Integrations
4. Click the "New Integration" Button
5. Select Okta Integration from the new drawer that opened
6. Fill out the form, entering your okta domain and then clicking "I have store integration", and fill in the client-id and secret key you collected in step number 2.
## OAuth Method
### Prerequisites
Before you begin, generate a temporary API key to use when creating the limited read-only OAuth application to assign its scopes. You can delete this API key after the process.
### Method
You perform OAuth integration through raw HTTP requests. Rezonate has developed a script to automatically create the application, and make the process easier and faster.
1. Install Python 3.6+
2. Install the [cryptography](https://pypi.org/project/cryptography/) and [pyjwkest](https://pypi.org/project/pyjwkest/) Python libraries using the following pip commands:
```
pip install cryptography
```
```
pip install pyjwkest
```
3. Run the **okta\_integration\_script.py** (attached below)script with the tenant ID and the temporary API token:
The TENANT\_ID is your Okta Identifier, which is the subdomain in the Okta domain. For example, in the case of rezonate.okta.com, the tenant\_id is rezonate.
After executing the script (which will take approximately 1-2 minutes), save the output (the tenant\_id, application\_id, and private key).

## Response & Remediation actions prerequisites
Rezonate allows an automatic, on-demand, and scheduled execution of response & remediation actions in Okta.
Available response actions in Okta
To enable this capability, you will need to provide Rezonate with the following permissions:
```
'okta.users.manage',
'okta.groups.manage'
```
{% file src="/files/KJ0j7xcMpqy9KwMVlcqw" %}
# Okta Integration -Remediation Supported
Integrating with Okta can give Rezonate complete visibility into assets, privileges, and activities. With the remediation version, you can also fix risks with Rezonate and save time.
{% hint style="info" %}
This integration requires **write** privileges, if you prefer the Read-Only integration please select [Okta Integration](/core-integrations/okta-integration)
{% endhint %}
{% hint style="success" %}
This integration supports semi-automatic remediation, to improve your security efforts and save time for your team
{% endhint %}
**There are 2 different, supported ways to integrate Rezonate with Okta, all explained in this document:**
1. By Generating an API Key
2. Through the Okta Marketplace
## API Key Integration
### Method
For this method, a **super administrative** API key is needed. this can be generated from the admin console. after creating the key, save and insert the Okta domain & the API Key.
## Okta Store Integration
1. Through Okta Store, select the Rezonate API Service integration and after reviewing the permissions click "Install & Authorize"\
\

2. Take note of the application Client-id & Client-secret.
3. Login to the Rezonate Console, and click the settings button in the top menu\
\
4. On the side menu, select Cloud Integrations\

5. Click the "New Integration" Button\

6. Select Okta Integration from the new drawer that opened\

7. Fill out the form, entering your okta domain and then clicking "I have store integration", and fill in the client-id and secret key you collected in step number 2.\
\

# Google Workspace
# 1-Click Integration
Integrate Google Workspace within a click, by installing the Rezonate Marketplace Integration
{% hint style="info" %}
Google Workspace 1-Click Integration requires a privileged Google user for the process
{% endhint %}
With Google Workspace integration Rezonate is analyzing the Workspace environment, mapping inventory, scanning for Posture Issues, and hunting for threats.
This integration has 2 Modes:
* Read Only - This enables Identity mapping, Posture scanning, and ITDR Capabilities.
* Read\Write - This enables all of the read capabilities, plus, the ability to remediate risks from the product automatically.
To Integrate, browse to the Rezonate integrations screen, and select Google Workspace
Select Google Workspace from the second line, to the right.
Then, Select the preferred integration mode (Read-only or Read-Write)
You will see the following screen, click Advanced and Approve.
\
Clicking on the button will redirect you to the Google Consent screen. select your user and then after reviewing the required permissions click on the Allow button. You will be redirected to the platform and the integration process is completed.
Concent Screen - Rezonate Integration
### Additional permissions that are required for remediation support
To support remediations executed from the Rezonate platform, additional permissions are required.\
These privileges allow the platform to Suspend\Delete users, enforce MFA, change group assignments, and perform additional actions as part of risk reduction features.
Scope for access to all group member roles and information operations
# Legacy Integration
This document describes how to integrate the Rezonate product with Google Workspace.
### 1. Grant Rezonate access to your Google Workspace Directory
1. From your domain’s [Admin console](http://admin.google.com/), navigate to the **Main menu** > **Security** > **Access and data control** > **API controls**.\

2. In the **Domain-wide delegation** pane, select **Manage Domain-Wide Delegation**.\

3. Click **Add New**.
4. In the **Client ID** field, enter the unique ID of Rezonate’s service account - **114686202188972918951**.
5. In the scopes fields, copy-paste the following scopes for read-only access:
```
https://www.googleapis.com/auth/admin.directory.user.readonly
,
https://www.googleapis.com/auth/admin.directory.group.readonly
,
https://www.googleapis.com/auth/admin.directory.group.member.readonly
,
https://www.googleapis.com/auth/admin.directory.device.mobile.readonly
,
https://www.googleapis.com/auth/admin.directory.orgunit.readonly
,
https://www.googleapis.com/auth/admin.directory.rolemanagement.readonly
,
https://www.googleapis.com/auth/admin.directory.userschema.readonly
,
https://www.googleapis.com/auth/admin.directory.domain.readonly
,
https://www.googleapis.com/auth/admin.directory.device.chromeos.readonly
,
https://www.googleapis.com/auth/admin.reports.audit.readonly
,
https://www.googleapis.com/auth/apps.alerts,https://www.googleapis.com/auth/admin.directory.user.security,https://www.googleapis.com/auth/admin.directory.customer.readonly,https://apps-apis.google.com/a/feeds/domain/
```
6. Click **Authorize** to complete.
7. Send Rezonate the email address of your **Google Workspace administrator user or a Service Account with Administrative access to your Google Workspace**.
# Google Cloud Integration
{% hint style="success" %}
To integrate GCP you must first integrate Google Workspace
{% endhint %}
### Step 1 - Enable Required Google Cloud API
1. Log in to the Google Cloud console with **organization administrator** credentials.
2. Start Cloud Shell by clicking the CLI icon on the right side of the bar.↓
3. In the shell interface, enter the following script to enable required API access, in all of the projects that Rezonate should protect.
|
for project in $(gcloud projects list --format="value(projectId)")
|
| --------------------------------------------------------------------------------------------------------------------------------------------------------------------------------------------------------------------------------------------------------------------------------------------------------------------------------------------------------------------------------------------------------------------------------------------------------------------------- |
Enabling these API's allows us to enumerate resources, privileges, and other capabilities.
**List of APIs and their usage**
| API Endpoint | Why Rezonate Requests This Endpoint |
| ----------------------------------- | -------------------------------------------------------------------------------------- |
| cloudresourcemanager.googleapis.com | This API allows reading of the organizational structure and objects in it. |
| recommender.googleapis.com | This API allows the reading of Google insights regarding your organization. |
| cloudasset.googleapis.com | This API allows the reading of resources within your projects. |
| policyanalyzer.googleapis.com | This API allows the reading of policies throughout the whole organizational structure. |
### Step 2 - Grant Rezonate Access to Your Google Cloud Organization
1. Head over to the [IAM ](https://console.cloud.google.com/iam-admin/iam)page. Use the organization/project drop-down list to choose your **Organization**.
2. Click **Grant Access**.
3. In the New Principals box, enter the email address provided by Rezonate - ****, to establish trust between the organizations.
4. In the Role boxes, grant the new service account the following read-only roles, at the **organization level**:
1. Browser
2. Security Reviewer
3. Viewer
5. Click **Save**.
6. On the same page, you should now be able to see that Rezonate’s service account was assigned with the roles you added. 
7. Save and send your **organization ID** and the **project IDs** you wish Rezonate to protect. 
8. Execute the following commands to retrieve your organization ID, and the list of all project IDs and filter the ones you want Rezonate to access:
|
gcloud projects list --format="value(projectId)"
gcloud organizations list --format="value(ID)"
|
| -------------------------------------------------------------------------------------------------------------------- |
# Zoom Integration
Integrating with Zoom can give Rezonate visibility into identities, roles, and posture control detection.
### Integration Instructions
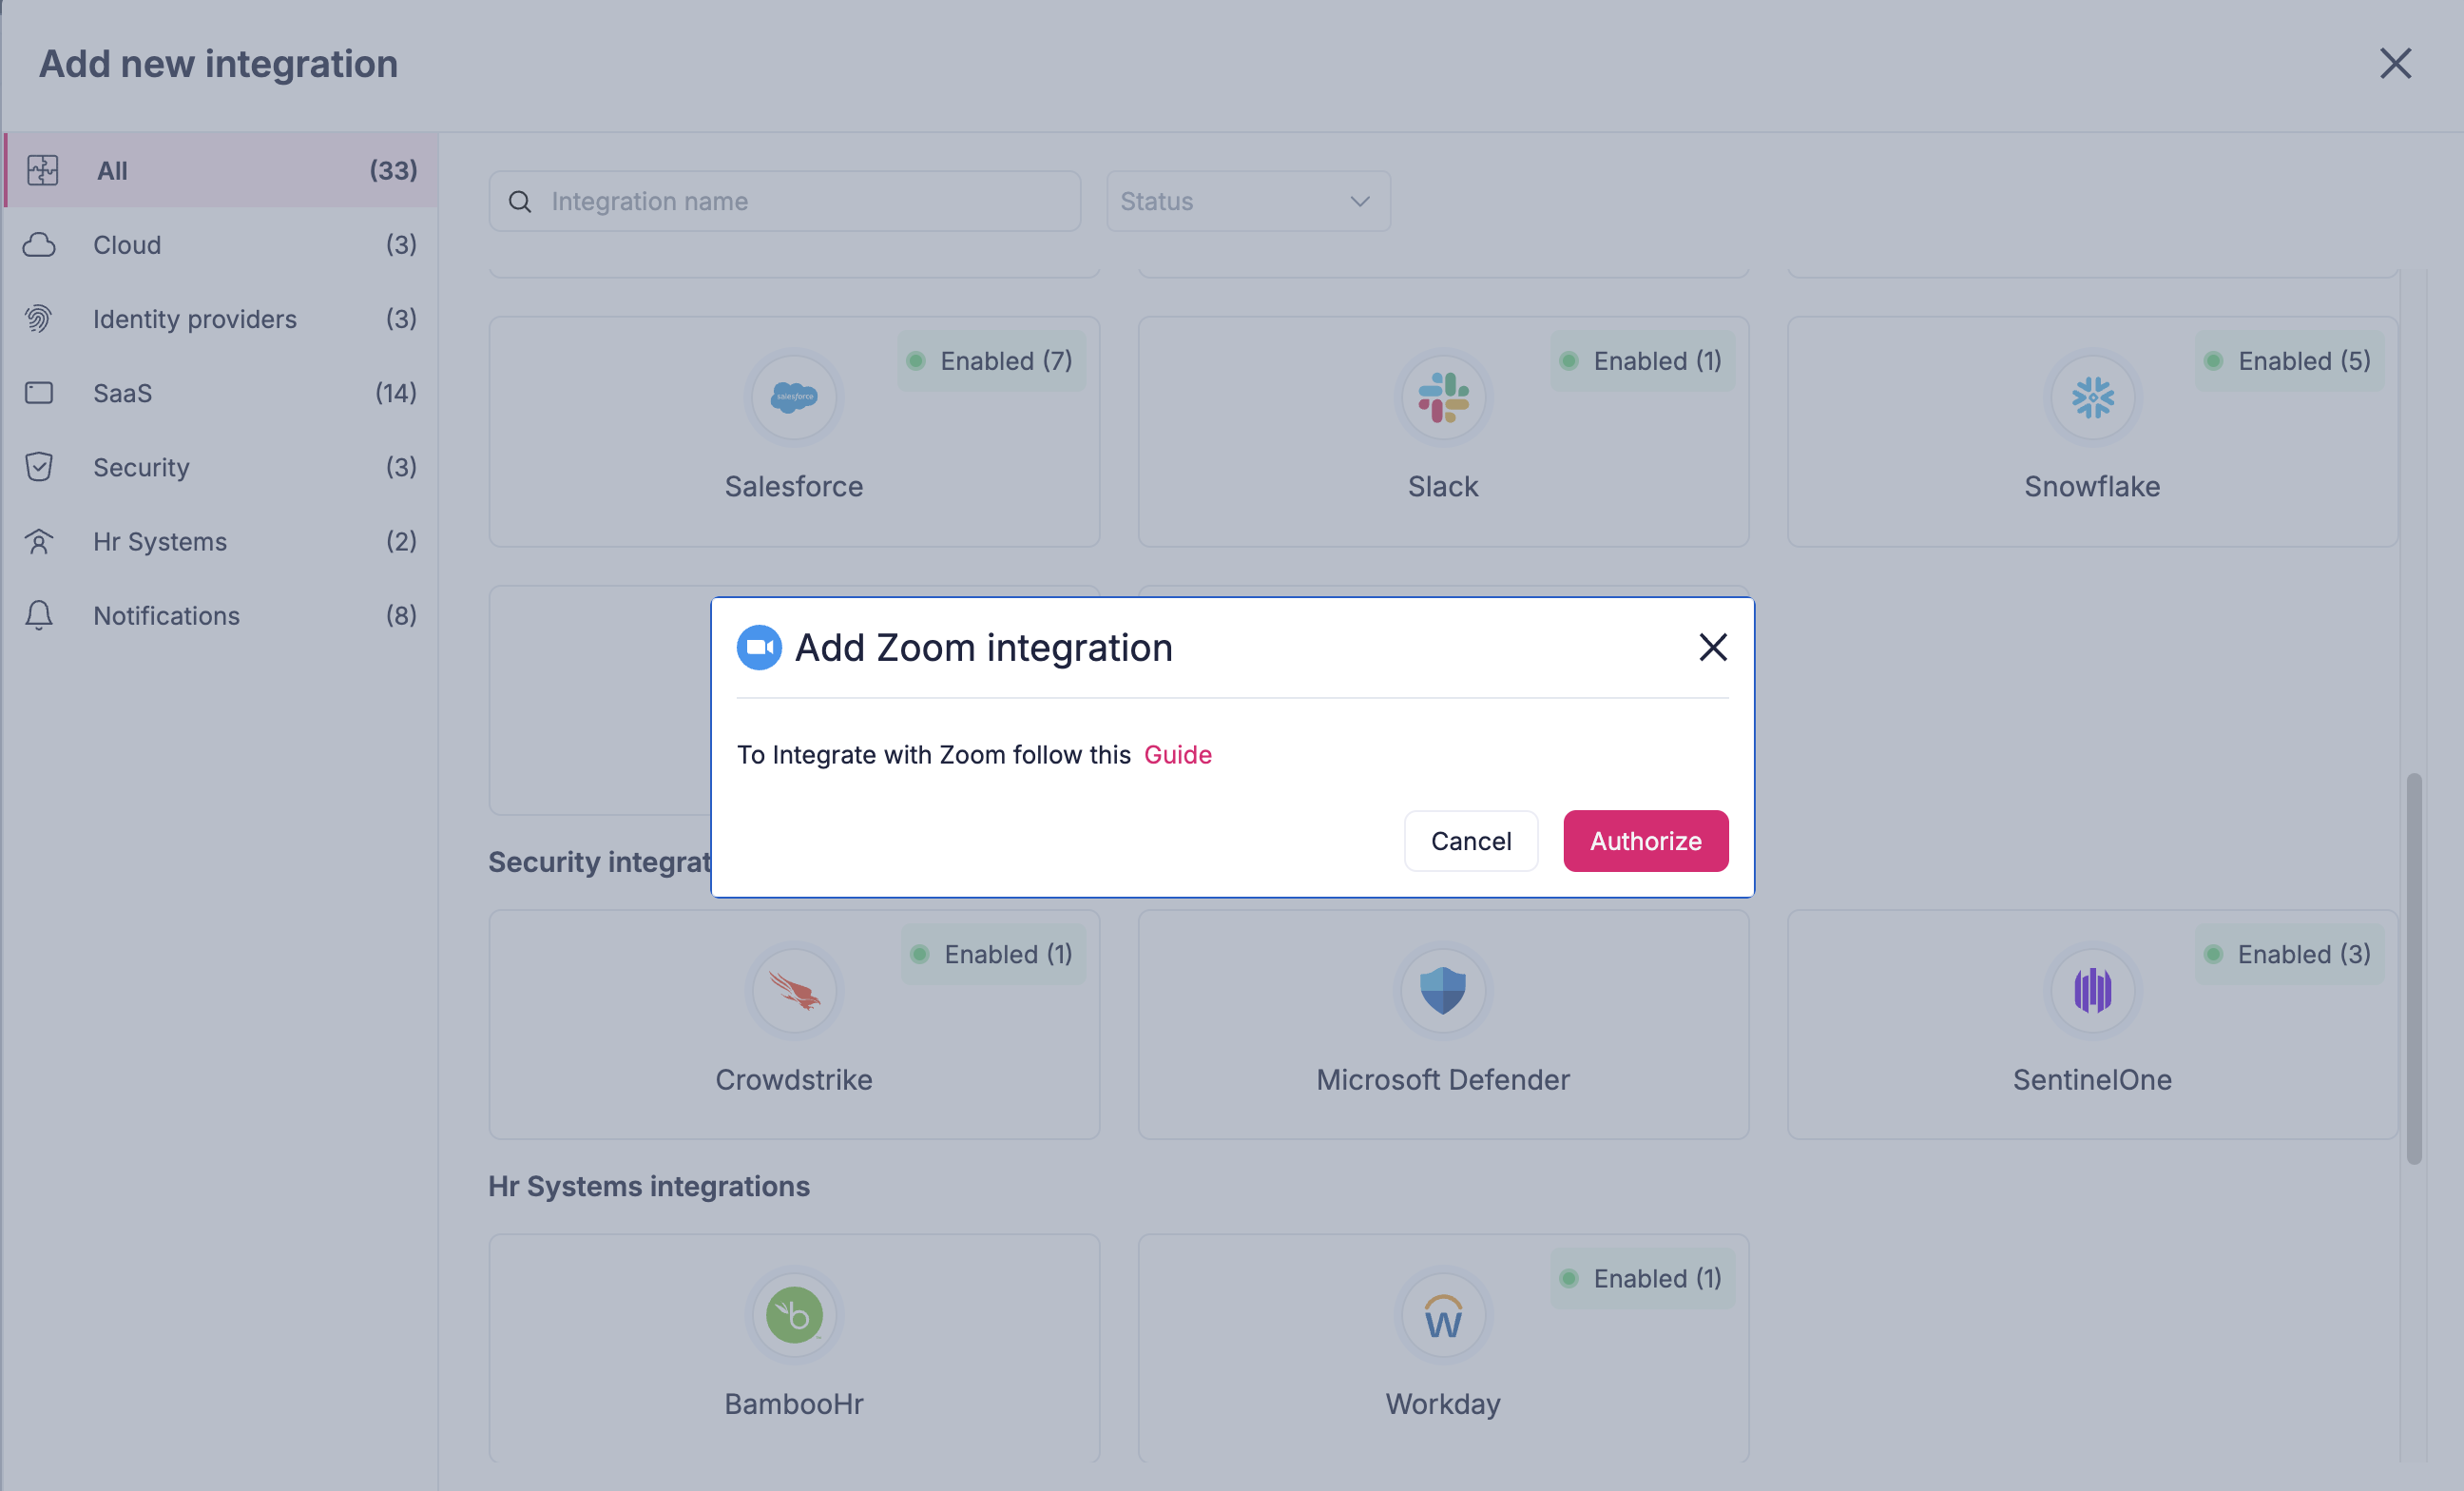
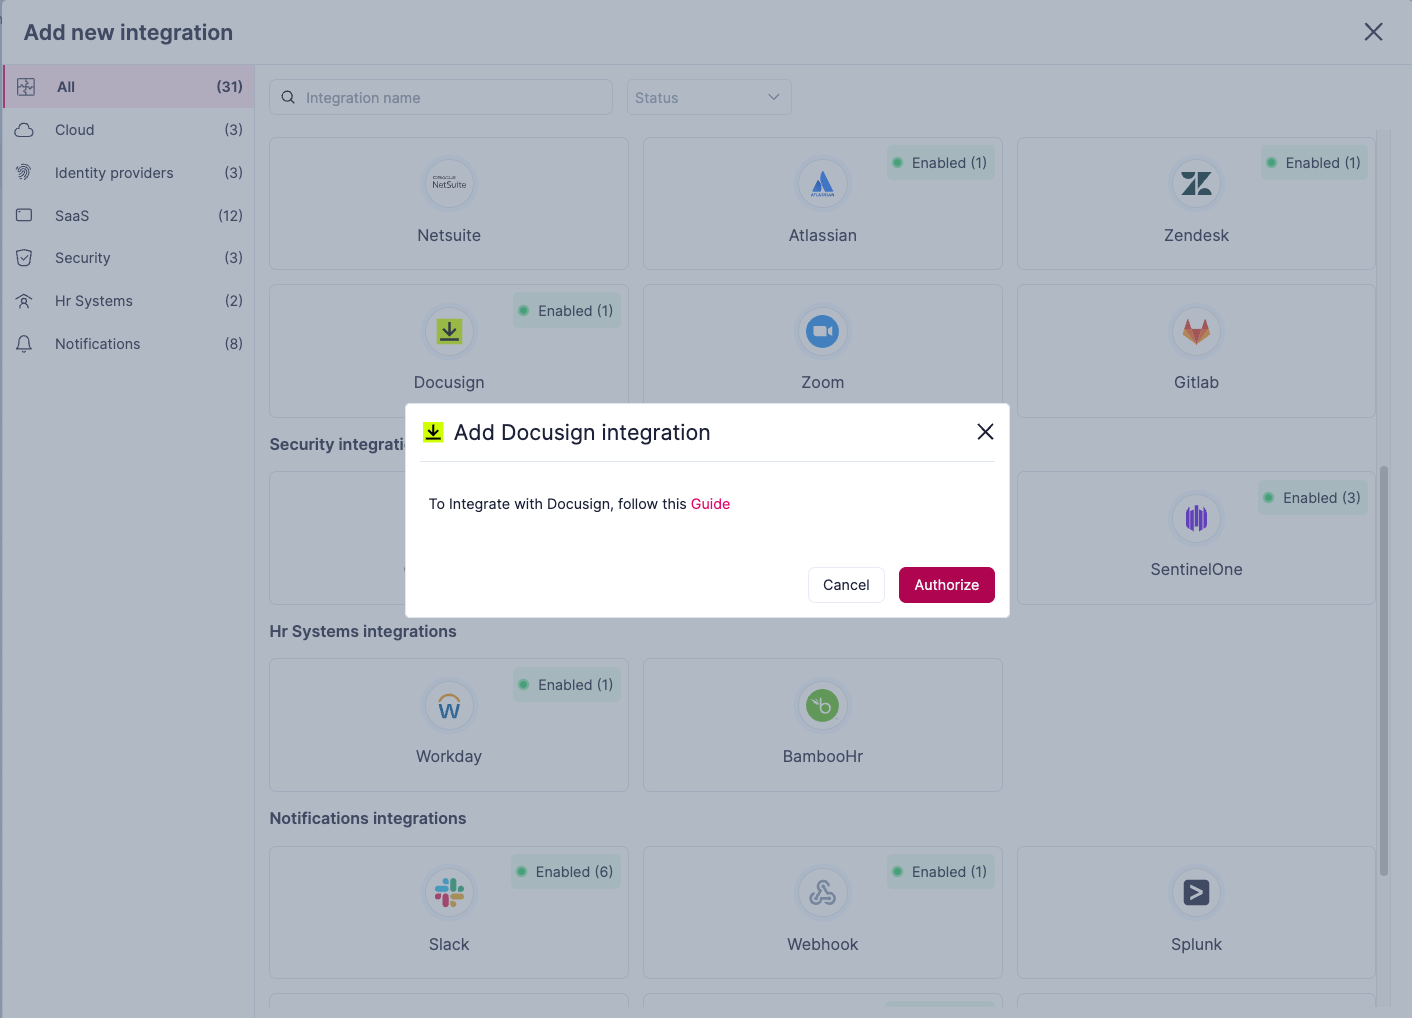
Click on the Integrations management in Rezonate, select Add Integration, and click on Zoom.
In the opened form, click Authorize, which will lead you to the Zoom OAuth Approval Form
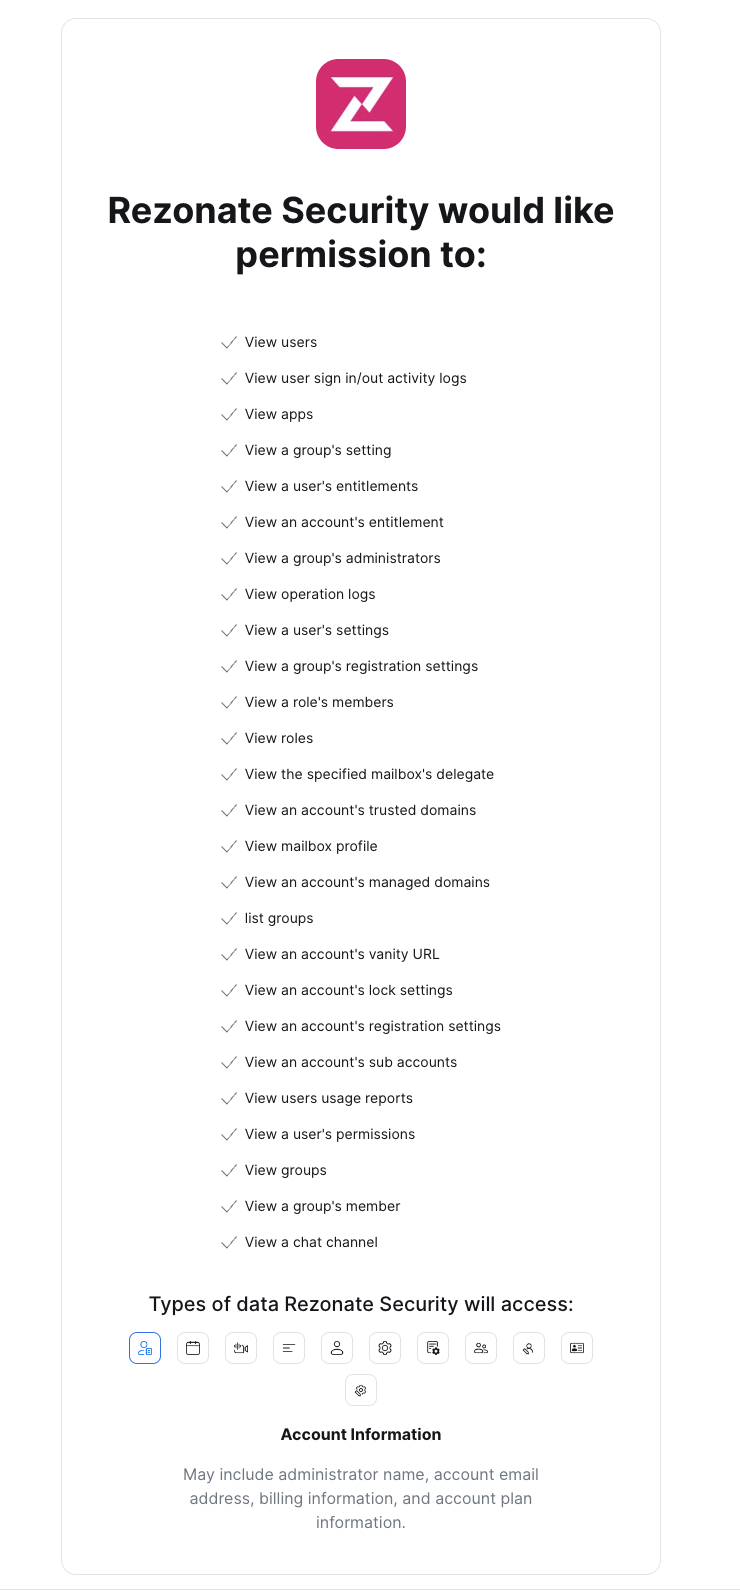
You will see a list of permissions required by Rezonate. Note that all of them are read-only.\
Approve the form, and you will be redirected back to Rezonate, with the integration Completed!
{% hint style="info" %}
**NOTE**: Rezonate does not have any write capabilities as part of the integration. however, the Owner of the account must be the one who authorizes it, for full visibility for Roles & Access.
{% endhint %}
### Annex, Required Privileges
* View users
* View user sign-in/out activity logs
* View apps
* View a group's setting
* View a user's entitlements
* View an account's entitlement
* View a group's administrators
* View operation logs
* View a user's settings
* View a group's registration settings
* View a role's members
* View roles
* View the specified mailbox's delegate
* View an account's trusted domains
* View mailbox profile
* View an account's managed domains
* list groups
* View an account's vanity URL
* View an account's lock settings
* View an account's registration settings
* View an account's sub-accounts
* View user's usage reports
* View a user's permissions
* View groups
* View a group's member
* View a chat channel
# DocuSign Integration
Integration is a one-click and can be performed from the Rezonate integrations store.
# GitHub Integration
{% hint style="info" %}
This integration **does** **not** **have** **access** to source code or any of their content
{% endhint %}
### First Installation of the app
1. From the integration page, select GitHub, and then click on the 1-Click integration, and click on the Connect Button

2. Scroll to the bottom of the page and select "Install for free".
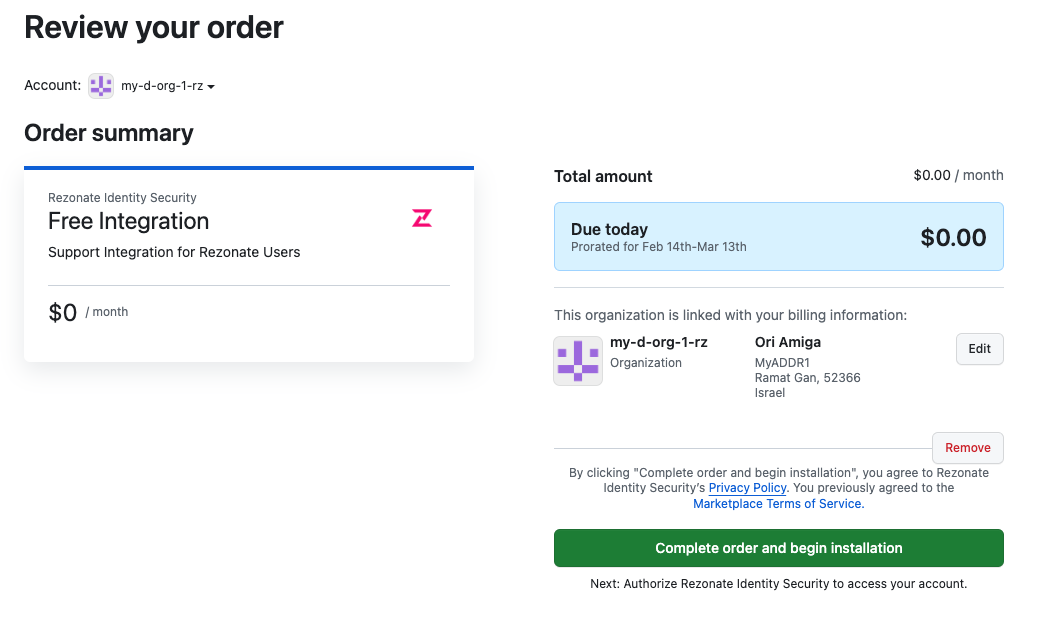
3. Make sure to select the relevant organization and then Click on "Complete order and begin installation"
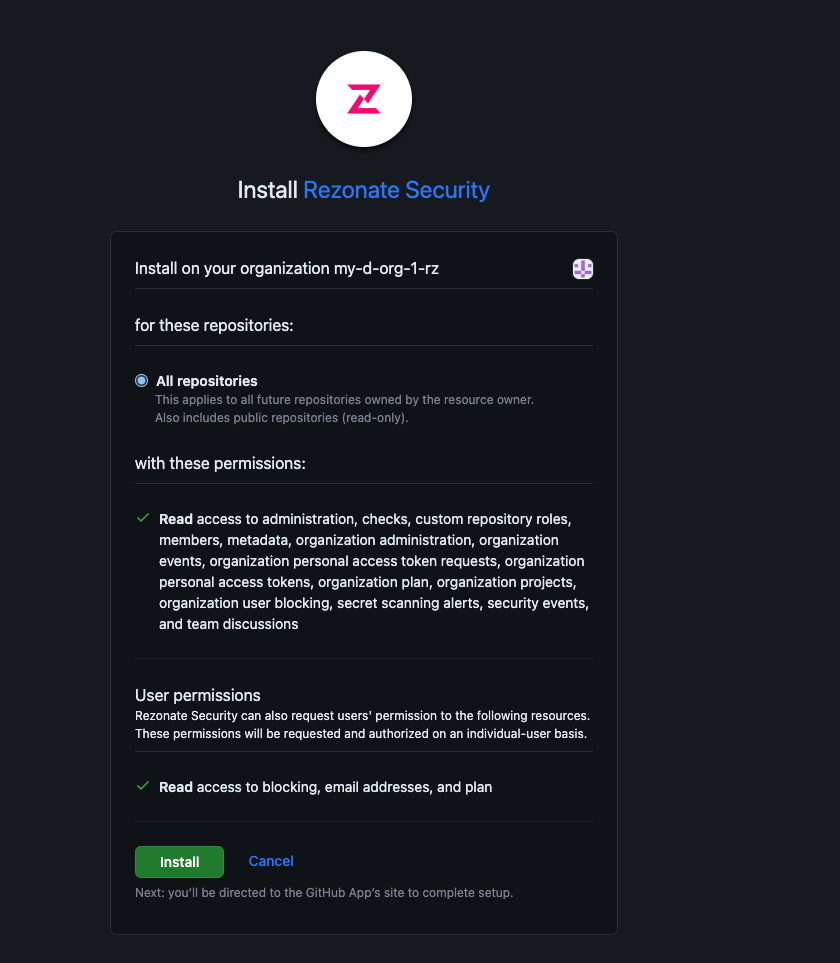
4. Click "Install", please make sure to select "All repositories" or at least 1 repository that you wish to include. you will then be redirected to Rezonate and the integration would be installed.
### Modifying the already installed application
This may be relevant in cases when limited access was granted in the first installation. To add more accessible repositories to Rezonate, browse the link below: \
\[Make sure to be authenticated as an admin of your Team\Organization]
{% embed url="" %}
1. After Browsing, click on the "Configure" Link
2. Select the relevant Team to install the application onto
2. Click on the Repository access and make sure it is either marked as "All Repositories" or has at least 1 repository selected, based on your requested coverage.
3. Click Save
# GitHub Enterprise Expansion
#### GitHub Enterprise Integration Overview
This GitHub Enterprise integration builds on the existing GitHub integration within the Rezonate platform, specifically designed to enhance identity security through OIDC-based federation between EntraID and GitHub. The integration detects key federation relationships and tenant-level policies, offering greater control and reducing potential misconfigurations.
**Key Features:**
1. **Federation Detection:** Automatically identifies and monitors the federation between EntraID and GitHub via OIDC, improving overall visibility into authentication flows.
2. **Policy Detection:** Detects tenant-level configurations for additional SAML and OIDC providers, ensuring policy alignment across federated identity systems.
3. **MFA Exposure Improvement:** By accurately detecting these federations and policies, the integration helps minimize false-positive MFA issues, leading to smoother authentication experiences.
This integration provides enhanced coverage for organizations using GitHub Enterprise, ensuring proper identity configuration and reducing security gaps related to authentication mechanisms.
***
### Integrating Steps
{% hint style="info" %}
This integration Requires READ-ONLY Access and has to be performed by an Enterprise Administrator
{% endhint %}
1. Log in to GitHub with a GitHub Enterprise admin account
2. On the top-right corner of the screen, click on the user’s avatar
3. Click on “Your enterprise”
4. Copy the and share with Rezonate the GitHub enterprise name from the redirected url:\
[https://github.com/enterprises/\\ ](
>)
5. Create a classic Personal access token:
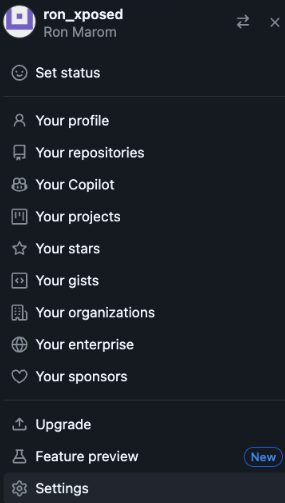
6. On the top-right corner of the screen, click on the user’s avatar -> Click on “Settings”\
7. From the left pane menu, scroll to the bottom of the page and click on “Developer settings”
8. From the left pane, expand “Personal access tokens” and choose “Tokens (classic)”
9. Click on “Generate new token” and choose “Generate new token (classic)”
10. Name the token “Rezonate Integration Access Token”, Set the expiration to 1 year.
11. Select the following scopes:
1. read:org
2. read:enterprise
3. read:user
4. user:email
12. Click “Generate token”.
Share back with Rezonate the following:
* Enterprise Name (As extracted from the URL)
* The generated Token.
# AWS Integration
This document describes how to integrate the Rezonate product with AWS, which provides IAM observability to users, groups, channels, and configurations as well as detection of different security ris
This document describes the integration process for an AWS account to the Rezonate Platform, in a single-click deployment.
\
The integration will create a [**read-only**](https://public-access-rezonate-cloudformation.s3.eu-central-1.amazonaws.com/rezon-readonly-role.txt) role in the AWS account, allowing Rezonate to collect logs, identify identities, and access configuration.
## Deployment Instructions
### Deploying Rezonate to a Single Account (**CloudFormation Stack)**
1. please log in to the target account, and then click on the following link.\
\
2. In the external id field, please write the value provided to you by the Rezonate team, or alternatively put any **random string** (8 chars or longer)\
\

3. Tick the relevant checkboxes and click the **Create stack** button.\
\
\
\
4. Wait for the deployment to finish (Takes approx. 1-2 minutes), click the outputs tab and copy the created role ARN.
5. Please share back with the Rezonate team the following:
1. The created role ARN
2. The external ID that was used.
### Deploying Rezonate to a multi-account (**CloudFormation StackSet)**
1. Please login to the Master account (or to the account used for Deployments) and browse to the following link - \
2. In the Specify Template, please paste the following URL \
\
And Click the next button.\
3. Select your own Stackset Name and in the ExternalId,
4. please write the value provided to you by the Rezonate team, or alternatively put any **random string** (8 chars or longer)\
\
Click Next.
5. Configure your deployment settings based on your regular preferences (or click next).
6. Select your preferred scope, and region and click next. (You can also modify deployment settings based on your preferences)
7. Click next, and in the final step scroll to the bottom, tick the box, and click submit.
8. Wait for deployment to succeed.\
9. bring back the selected external ID, The prefix (if changed), and the account numbers (if deployed to the entire organization then the Master account id is good enough )
#### Locating your Account ID, Role Name and ExternalId
1. Your Account ID can be easly located on the top right corner of the screen. \
If you integrated your entire organization, you need to provides the master-account ID.
2. The External ID is the input you selected during the creation of the stackset.
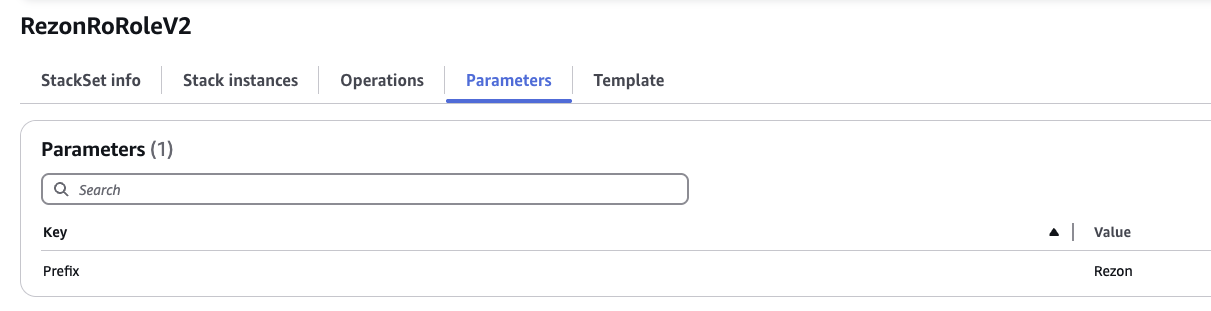
3. The Role name can be found by clicking on the StackSet menu item and selecting your stack.
4. In the inner screen (picture attached) , select Parameters \
5. In the Parameters View, you will find the Prefix that was selected for the created role
6. Concat the Word **RoRole** to the prefix. For example if your prefix is Rezon then the role name would be **RezonRoRole****.**
# AWS - Required Privileges
Privileges that are required for the AWS integration to work properly
Rezonate can be deployed in both Read-only and Read-Write modes, enabling additional remediation and prevention features.
{% hint style="info" %}
Note that RW mode should be deployed in addition to the ReadOnly role.
{% endhint %}
# Log Streaming Integration
{% hint style="warning" %}
**This step is optional and recommended for big environments with a high volume of logs.**
{% endhint %}
{% hint style="warning" %}
**This step should be performed only on the logs-archive account.**
{% endhint %}
To facilitate log streaming, complete the following steps:
1. [Deploy the **rezon-cloudtrail.yaml** CloudFormation stack template](https://rezonate.zendesk.com/hc/en-us/articles/7952282916509-AWS-Integration-Guide#h_01GQREB7C4RXC2VCE0YHQ0TNC1) to the account that owns the s3 CloudTrail bucket.
2. [Enable event-bridge notification support](https://rezonate.zendesk.com/hc/en-us/articles/7952282916509-AWS-Integration-Guide#h_01GQREBEY4CB6ZG292X23WH5XM).
3. [(Optional) Modify key policy](https://rezonate.zendesk.com/hc/en-us/articles/7952282916509-AWS-Integration-Guide#h_01GQREBQ16BE04Z91S5TVRSCDH).
#### Step 1: Deploy rezon-cloudtrail.yaml CloudFormation Stack Template
1. Login to the AWS Console for the account that owns the s3 CloudTrail bucket, and navigate to **CloudFormation** > **Stacks**.
2. Select **Create stack**, and then **With new resources (standard)**.
3. In the **Create stack** screen, upload the Rezonate log streaming template (rezon-cloudtrail.yaml), and then click **Next**.
4. In the **Specify stack details** screen, enter **Rezonate** for the stack name, and then click Next.
5. Scroll down and click next without changing any settings.
6. Check the acknowledgment box, and then click **Create Stack**.
The **rezon-cloudtrail.yaml** stack template provisions the following resources:
* * An SQS Queue and Event bridge rule that adds notifications for every new log file created in the CloudTrail bucket.
* A role that allows Rezonate to read CloudTrail logs from the bucket.
* Make note of the **SQS queue** and the **Arn** value for the CloudTrail bucket, which you can find in the output tab of the stack execution screen. You will need to provide these values to your Rezonate representative to complete the onboarding process.
#### Step 2: Enable Event-Bridge Notification Support
After deploying the rezon-cloudtrail.yaml stack template, enable event-bridge notification support for the CloudTrail bucket, as explained in the following steps.
1. From the AWS Console for the account that owns the s3 CloudTrail bucket, select the bucket, and then the **Properties** tab. This can be done through the console by surfing to S3, clicking the trail bucket, and then Properties.
2. Scroll to the **Amazon EventBridge** panel and click **Edit**.
3. Select the **On** radio button, and then click **Save Changes**.
#### Step 3: (Optional) Modify Key Policy
In some deployments, the log bucket may be encrypted with a key that is stored in another account (such as the organization master). If this is the case, you must make a small modification to the key policy to allow Rezonate to use it to decrypt the log files, as explained in the following steps.
1. Log in to the account that holds the key, and navigate to the key management service.
2. Select the key, and then the **Key Policy** tab.
3. Add the following policy to the text field.
```
KMS Resource Policy
…
{
"Sid": "Enable Log Archive to Decrypt using master keys",
"Effect": "Allow",
"Principal": {
"AWS": "arn:aws:iam::986349361966:root"
},
"Action": "kms:Decrypt",
"Resource": "*"
}
```
# Salesforce Integration
Rezonate integration into Salesforce
Integrating with Salesforce can give Rezonate visibility into identities, privileges, and activities. These data points are then used to detect security gaps and to extend your identity-centric with salesforce identity information. The integration is only reading data.
{% hint style="info" %}
If your Salesforce tenant has an IP Restrictions policy, you will have to whitelist Rezonate's collector IP Address. More information available [Collectors IP Ranges](/troubleshooting-and-support/collectors-ip-ranges)
{% endhint %}
**To Integrate please follow the following steps:**
Sign in to your salesforce tenant, with a privileged user, Find your instance URL copy it, and keep it for later.\

Click on Quick Settings, and then on Advanced setup \

Select Apps -> Apps Manager on the side-menu\

Select New Connected App\

In the form please fill in the following information:
Connected App Name: **Rezonate**
API Name: **Rezonate**
**After filing the basic information, make sure to tick the OAuth box and add the callback URL**
```
https://app.rezonate.io/settings/authorize_salesforce
```
**Add the following OAuth Scopes:**
1. Manage user data via APIs (api)
2. Perform requests at any time (refresh\_token,offline\_access)\
\
Make sure to **remove the checkbox** from the "Require Proof Key for Code Exchange"\

3. Also, make sure that the 2 checkboxes "Require secret for Web server flow" and "Require secret for refresh Token flow" are selected.\

Click the save\create button. After creating the application, you should see the button "Manager Consumer Details", and click on it.
You may be required to verify your identity, and after that, you will see a page with the key and secret, please copy them.
***
### Creating a Limited Read-Only User for the Authorization Process
After we have created and configured the application, we will need to create a Read-Only user to authorize it. For that, create a user with the Read-Only profile role, and log in. We will use it to authorize the application in the next step.
### Finishing the integration from the Rezonate Side
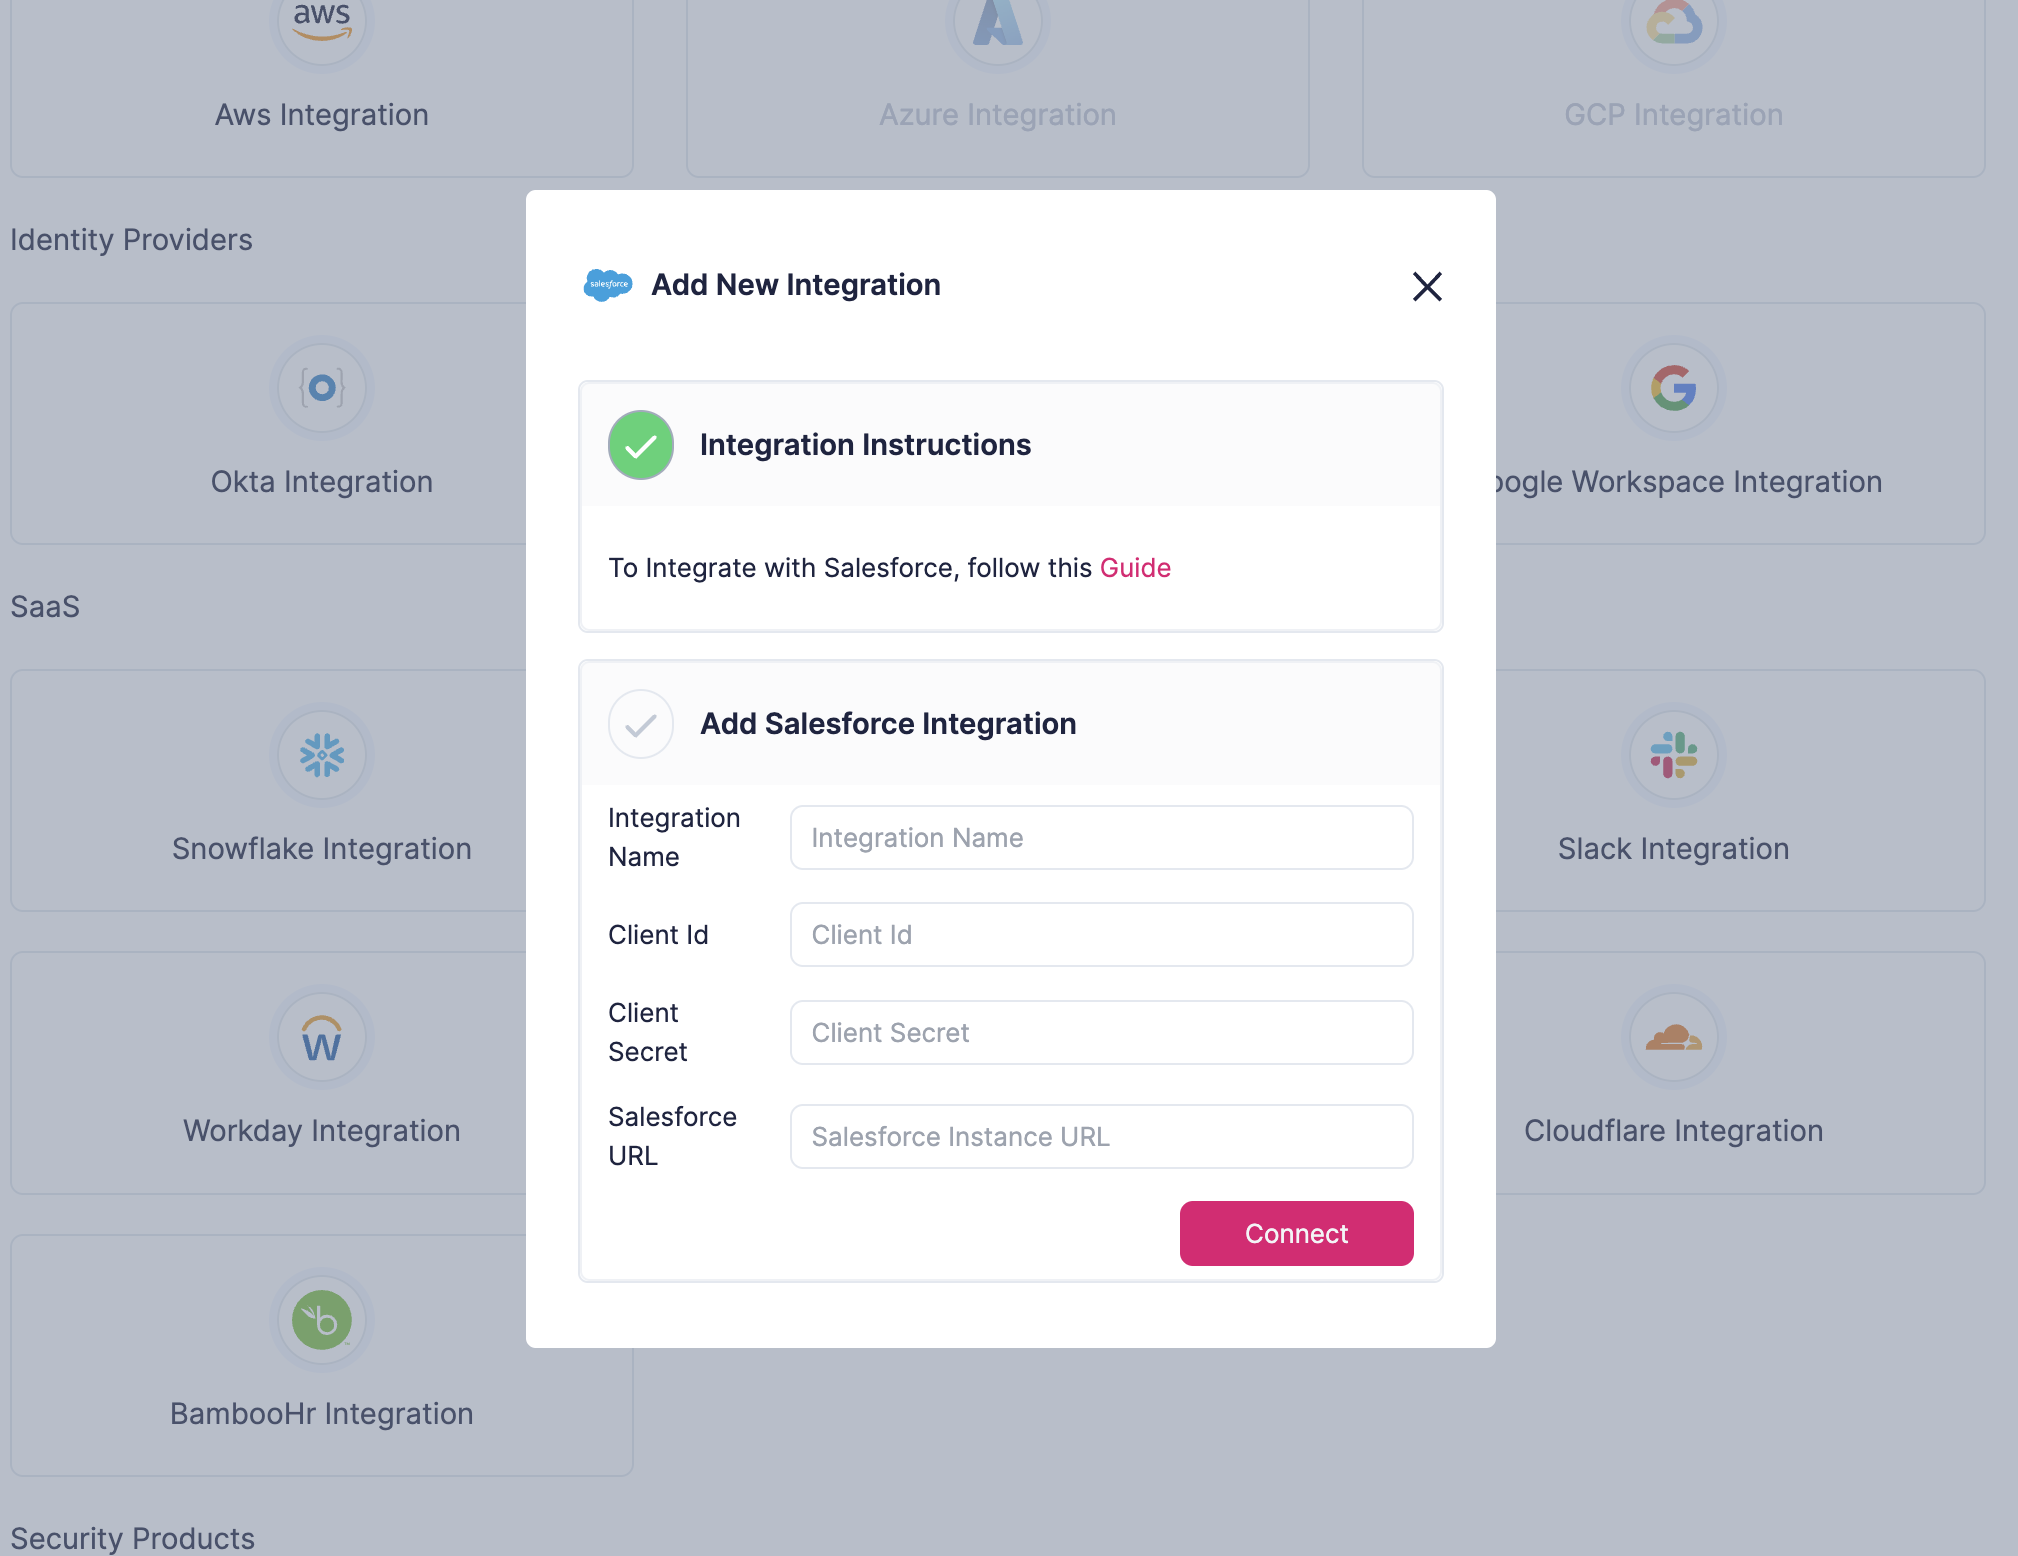
Now that we have the app credentials and the read-only user. we can sign in to Rezonate, and install the integration. for this one, click on settings, integrations, Add Integration, and select Salesforce.
Fill out the form with the recently collected information, and click Connect. Salesforce will ask you to authorize and approve the application, and you will be redirected to Rezonate, seeing that the integration was successfully added.
Property
Value
Account Id
Your own account name (call it how you prefer)
Client Id
The Consumer Key you copied from earlier
Client Secret
Teh Consumer Secret you copied from earlier
Salesforce Url
The domain (starts with https://) for your salesforce tenant login
After filing the information click on integrate and the process is completed!
# Salesforce - Collected Data & Query Volume
{% hint style="info" %}
Rezonate Collectors are aware of API Quota, and will stop if >50% of the daily limit is used
{% endhint %}
Rezonate's integration collects data from the following tables, every 12 hours:
Object Type
Description
user
Users' information, including basic data and properties.
user.license
Licenses associated with users
group
Groups that are defined in the tenant
group.member
Groups memberships
user.role
Definition of roles and their attributes.
profile
Represents a profile, which defines a set of permissions to perform different operations. Operations can include creating a custom profile or querying, adding, updating, or deleting information.
permission.set
Information regarding permission sets defined in the tenant and their attributes.
permission.set.assignment
Represents a user’s assignment to a permission set or permission set group.
permission.set.group
Mapping and assignments around permission sets and group in the tenant
permission.set.license
Represents a license that’s used to enable one or more users to receive specified permission without changing their profile or reassigning profiles. You can use permission-set licenses to grant access, but not to deny access.
saml.sso.config
SSO Configurations
auth.config.providers
Information regarding authentication providers (AuthConfigProviders)
package.license
Represents a license for an installed managed package.
publisher
Information regarding publishers in the tenant
# JAMF Pro Integration
By integrating JAMF Pro, Rezonate embeds an additional layer of device security in the Identities as part of the Identity Centric module. It also unlocks some security controls required for SOC\ISO regarding encryption and device policy.
### Integration Steps
1. Create API Role:
1. Sign in to JAMF Pro and navigate to **Settings > API roles and clients** (type ‘API’ in the search box)
2. Click “New+” on the top right screen of API roles and clients
3. Name the role “Rezonate Integration Role”
4. Add the following privileges and click save:
| Read Accounts | Read Computers | Read Computer Security |
| --------------------------- | --------------------------------- | ----------------------------------- |
| Read User | Read API Roles | Read Mobile Devices |
| Read Conditional Access | Read Departments | Read Disk Encryption Configurations |
| Read Jamf Protect Settings | Read Jamf Connect Settings | Read Password Policy |
| Read Patch Policies | Read Policies | Read SSO Settings |
| Read Static Computer Groups | Read Static Mobile Devices Groups | Read Static User Group |
| Read Smart Computer Groups | Read Smart Mobile Devices Groups | Read Smart User Group |
| Read Webhooks | Read API Integrations | Read Managed Software Updates |
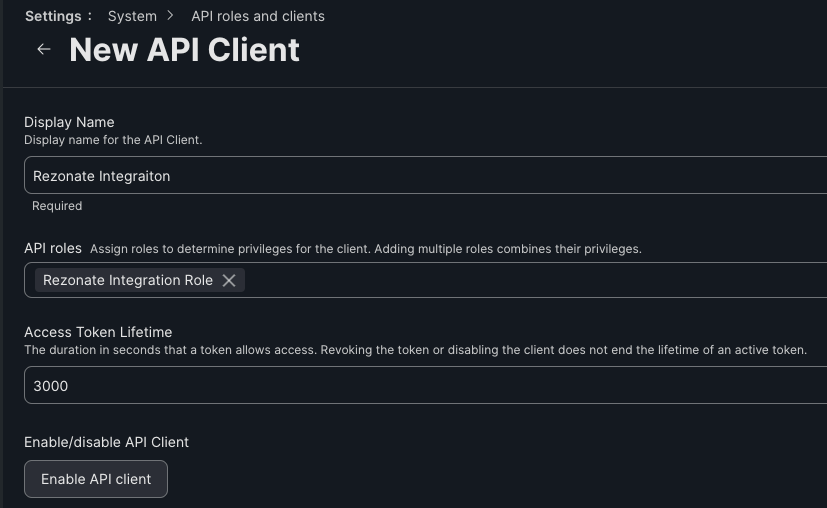
2. Create an API Client:
1. Navigate to **Settings > API roles and clients**
2. Select the API Clients tab
3. Click “New+” on the top right screen
4. Name the client “Rezonate Integration”
5. In the API roles section, select the new “Rezonate Integration Role”
6. Set the access token lifetime to 3000 (5 minutes)
7. Click “Enable API Client”
8. Click Save
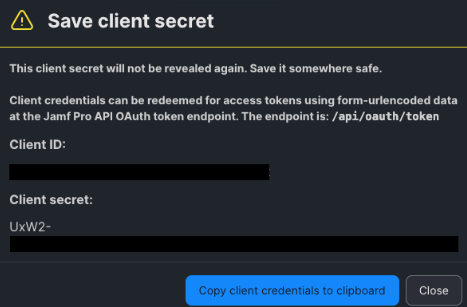
9. Click on the “Generate client secret” button and then create a secret
10. Copy and save the client ID and client secret
11. Share with Rezonate the following:
1. Your JAMF Domain in the form of \.jamfcloud.com
2. Client ID
3. Client Secret
### Integrating in Rezonate
In the integrations page, add a new integration and select JAMF.
# CircleCI Integration
{% hint style="info" %}
The organization-wide integration is based on a personal access token.
{% endhint %}
To create the token, follow the instructions:
1. Log in to your account at .
2. Navigate to **User Settings** via the user icon in the top-right corner.
4. Click **Create New Token**.
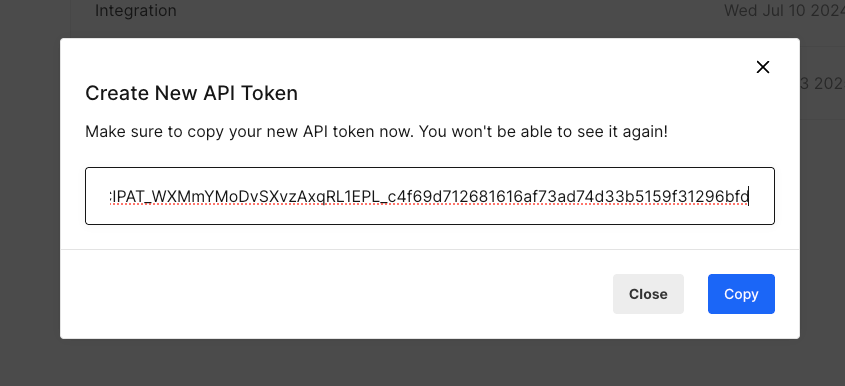
5. Provide a name for the token, such as Rezonate Integration and click **Add API Token**.
6. Copy the generated token and store it securely.
7. Paste this token in Rezonate’s platform to connect with CircleCI.
# Auth0 Integration
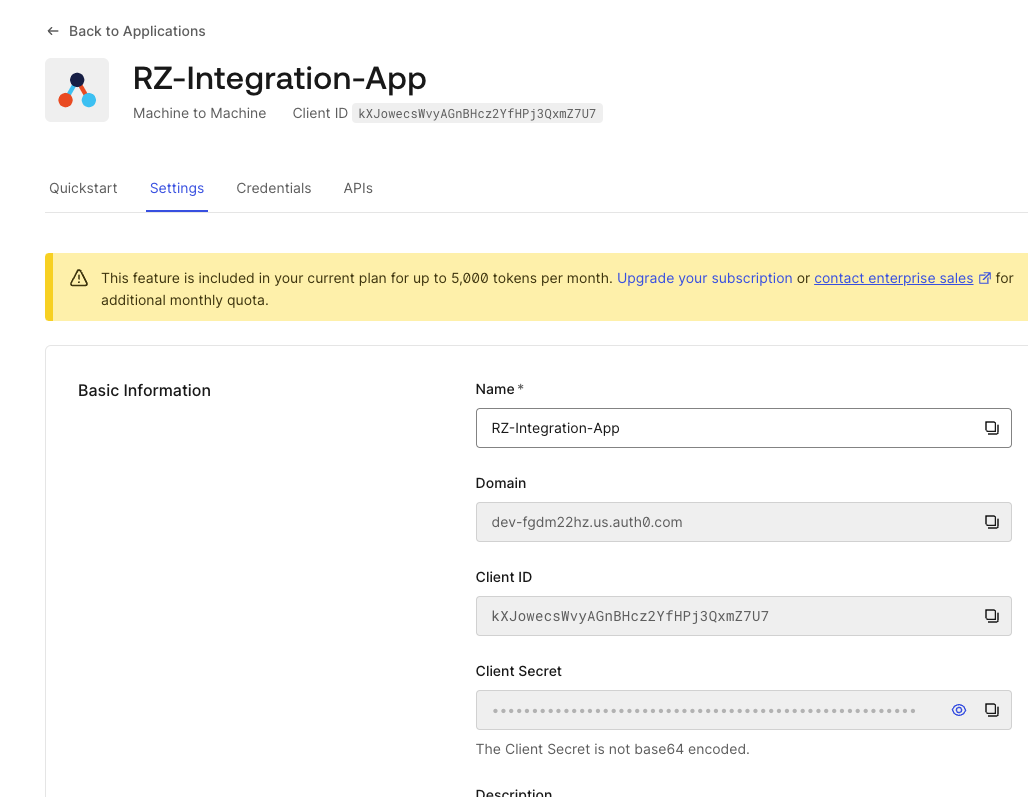
Integrating with Auth0 can give Rezonate visibility into identities, roles, and posture control detection.
The new Auth0 integration in Rezonate enhances visibility into identity and access structures, bringing in-depth insights into user configurations, roles, and permissions to bolster security management. By integrating data on configured applications, associated APIs, tenant settings, and user authentication controls, this solution allows for a comprehensive understanding of access points and organizational assignments.\
\
Integrating with Auth0 can give Rezonate visibility into identities, privileges, and tenant settings. These data points are then used to detect security gaps and to extend your identity-centric with auth0 identity information. The integration only reads data and has no writing capabilities.
### Information & Values
As part of the integration, Rezonate is analyzing the following data points:
1. Users, configurations, and associated roles and permissions.
2. Roles & Definitions
3. Organizations and assignments (if applied)
4. Configured Applications & Associated APIs
5. Connections Informaiton
6. Tenant Settings & User Authentication Security Controls
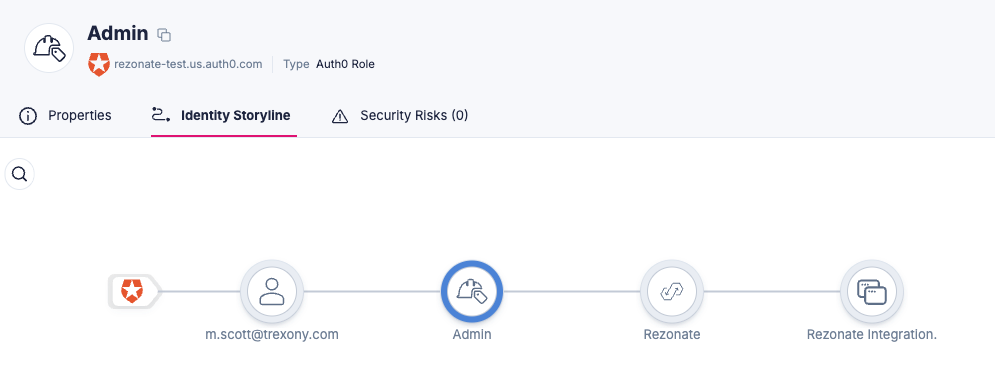
Example from Auth0 Role, Identity Storyline, Rezonate
***
## Integration Steps
### Creating a Service Account In Auth0
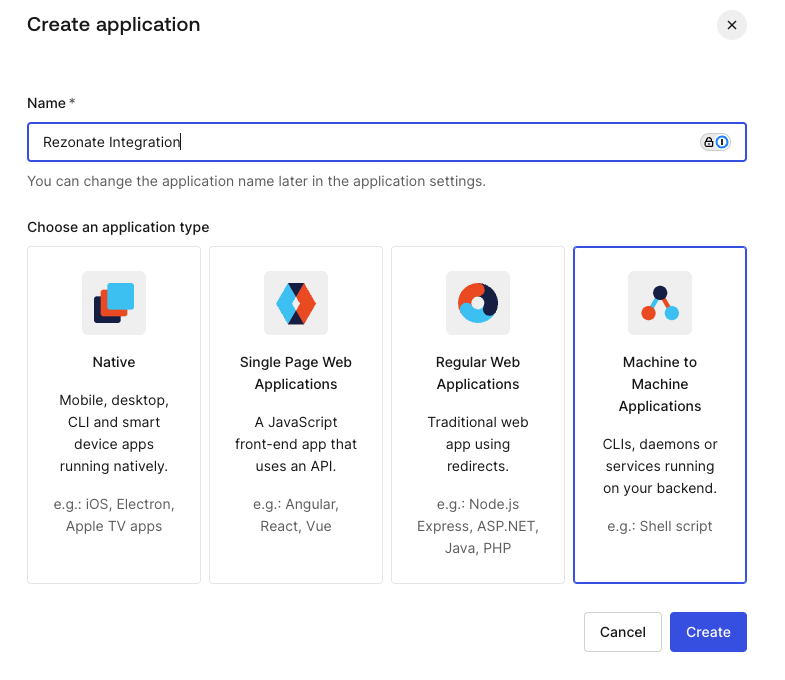
1. Browse to the Auth0 management console, and Create a new Application
2. Select Machine to Machine
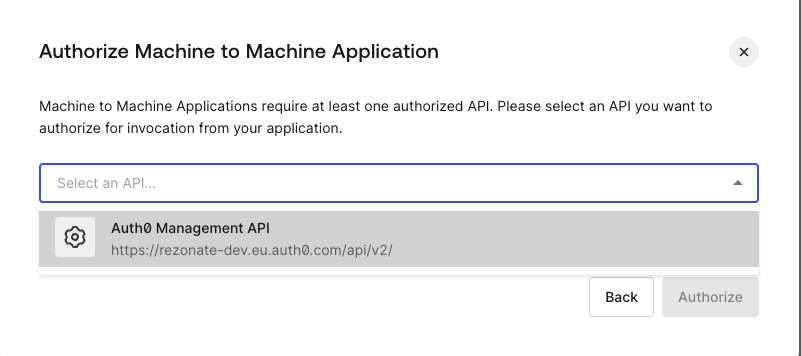
3. Select **Auth0 Management API**
3. Select the following permissions
| Scope |
| -------------------------------- |
| read:users |
| read:client\_grants |
| read:users\_app\_metadata |
| read:clients |
| read:connections |
| read:resource\_servers |
| read:rules |
| read:rules\_configs |
| read:hooks |
| read:actions |
| read:email\_provider |
| read:stats |
| read:insights |
| read:tenant\_settings |
| read:logs |
| read:logs\_users |
| read:shields |
| read:anomaly\_blocks |
| read:triggers |
| read:guardian\_enrollments |
| read:custom\_domains |
| read:email\_templates |
| read:mfa\_policies |
| read:roles |
| read:prompts |
| read:branding |
| read:entitlements |
| read:organizations\_summary |
| read:authentication\_methods |
| read:organizations |
| read:organization\_members |
| read:organization\_connections |
| read:organization\_member\_roles |
| read:organization\_invitations |
| read:scim\_config |
| read:phone\_providers |
| read:sessions |
| read:self\_service\_profiles |
| read:forms |
| read:flows |
Take Note of the **Domain**, **Client** **ID**, and **Client** **Secret** from the basic information.
### Integrating In Rezonate
In the integrations page, select Auth0 and fill in the recently noted Auth0 Domain, ClientID, and Client Secret.
# Cloudflare Integration
Cloudflare integration enhances the Rezonate Identity storyline with additional context regarding privileges from Cloudflare, adds additional security control that can be monitored, and more.
### Integration Steps
To Integrate start by [signing in to your Cloudflare console](https://dash.cloudflare.com/) with an administrative user.
Click the search, write "API, " and select **API Tokens.**
Searching for API in Cloudflare dashboard
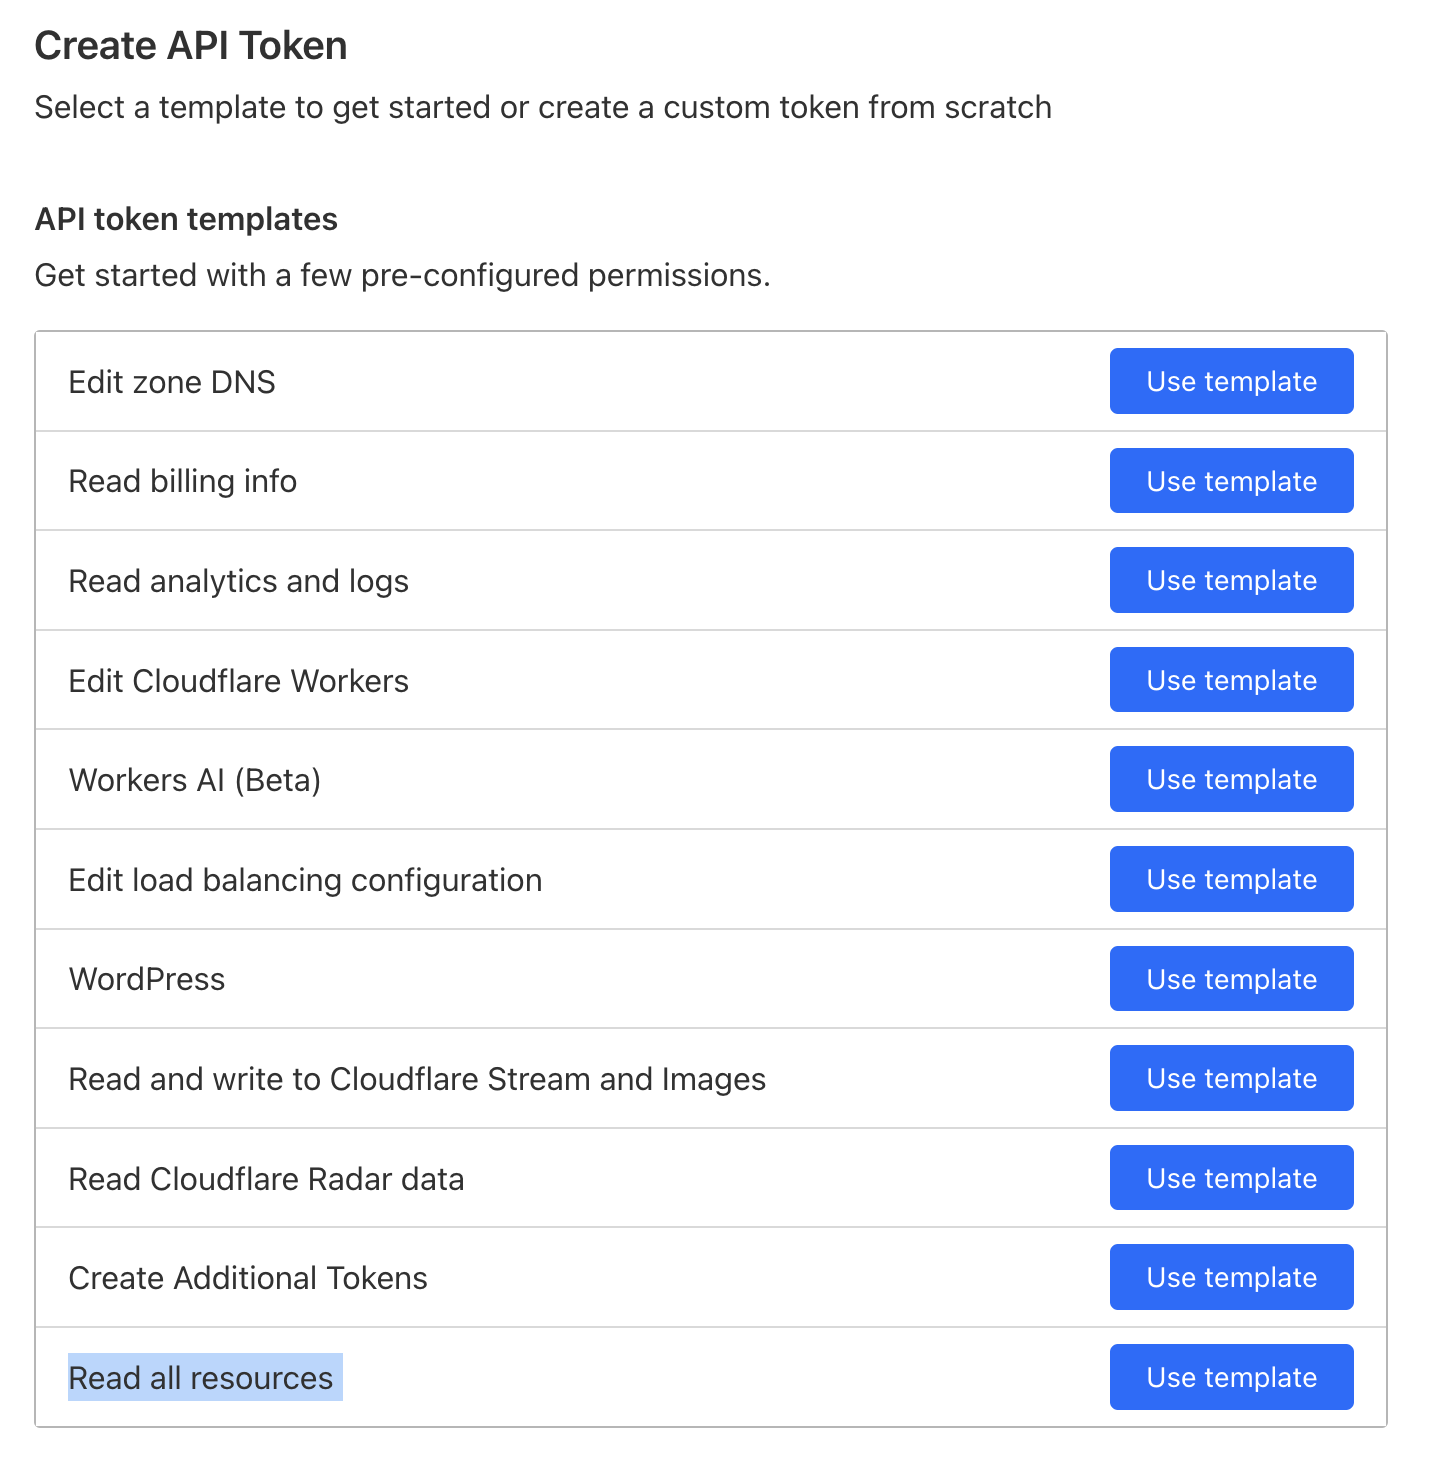
Click "Create Token"
Select **Read All Resources** template
After that, Scroll down to the bottom of the page and click **Continue to Summary.**
Then click "**Create Token**"
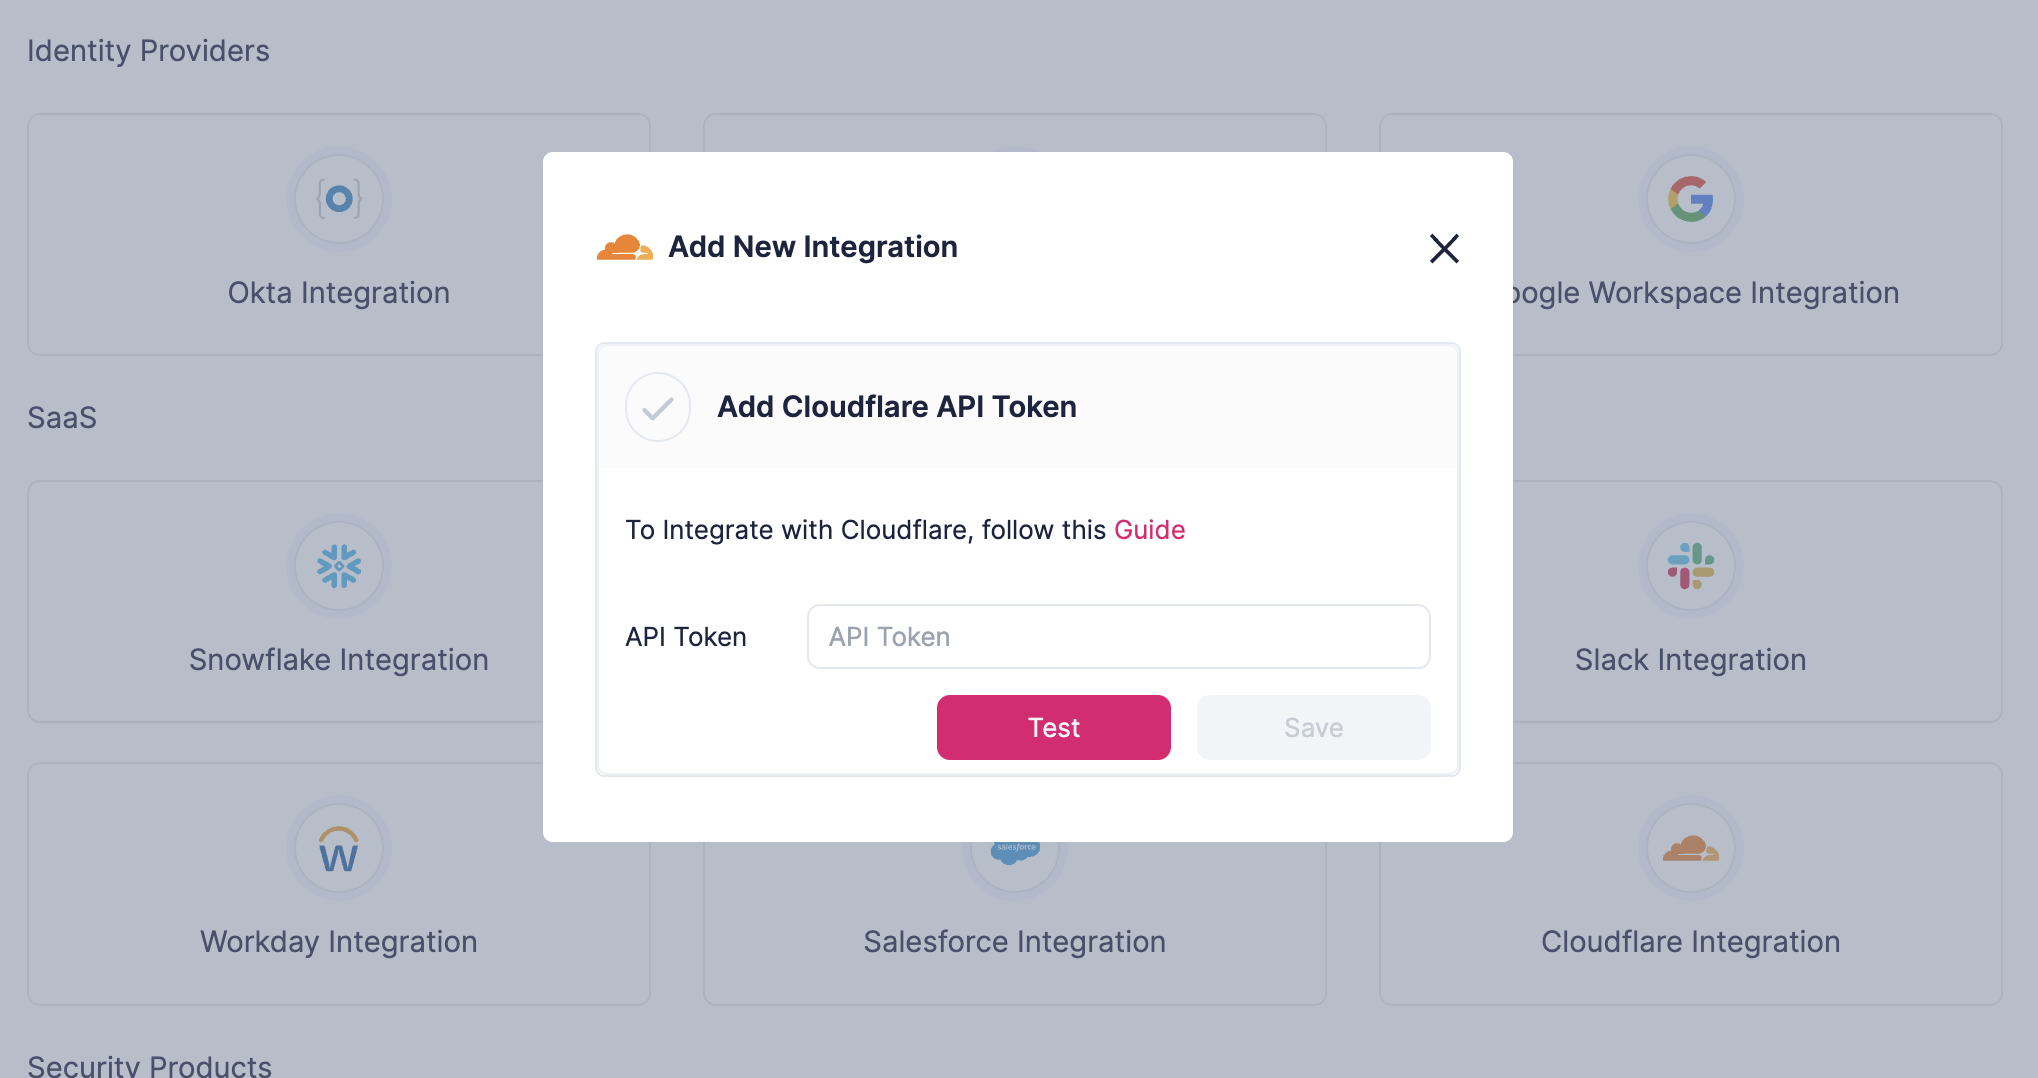
You will now see the created API Token, copy it and paste it into the Rezonate integration page.
# CrowdStrike Integration
High-level information regarding the CrowdStrike integration
{% hint style="info" %}
:tada: Rezonate has officially announced the integration with CrowdStrike. \
read more about it in the [CrowdStrike marketplace](https://marketplace.crowdstrike.com/partners/rezonate)
{% endhint %}
Rezonate integrates with the CrowdStrike Falcon® platform to extend threat detection, response, and attack analysis to identities across cloud, SaaS, and identity providers. With this integration, SOC analysts can seamlessly correlate user-machine and cloud identity data, monitor activity, and assess the potential impact of compromised endpoints on cloud privileges. By bilaterally sharing threat signals and enabling response actions across the CrowdStrike and Rezonate platforms, security teams can detect and block lateral movement between on-premises and cloud environments, stopping attacks at any stage.
### Unified detection and response orchestration
Bilaterally share real-time threat signals from CrowdStrike and IOCs from Rezonate across platforms to improve threat detection and prevention of lateral movement, account takeovers, and cloud/SaaS privilege abuse
### Blast radius analysis
Extend the discovery of identities and privileges from CrowdStrike Falcon® Identity Protection across cloud, SaaS, and identity providers to enhance containment and minimize the damage of a potential attack
### Identity and access investigation
Streamline investigation of suspicious user and machine activities across cloud infrastructure, SaaS, and identity providers with shared real-time monitoring insights from Rezonate in the Falcon platform
ITDR Detection - Example, Rezonate.
### Adding the integration
1. Set up the integration as defined in the [Integrating Permissions](/core-integrations/crowdstrike-integration/integrating-permissions).
2. Browse to the Rezonate Integration Page, and select the "Add new integration" button
3. Select CrowdStrike and fill out the form (Enter Account ID, And afterwards, the relevant API Key)
# Integrating Permissions
This document describes integrating the Rezonate product with CrowdStrike Falcon, which provides observability to on-premise hosts, users, and CrowdStrike detection data.
### Integrate through Webhook
**Note:** To Integrate, please perform the following actions after authenticating to CrowdStrike as a **Falcon Administrator**.
1. Navigate to CrowdStrike Store > All apps\
\

2. Scroll down to the “Plugins” section and click on Webhook\
\

3. Click “Configure”:\

4. Click "Add Configuration" and configure the following:
1. Name: Rezonate Webhook
2. Webhook URL: {Url Received From Rezonate}
3. HMAC Secret Key: {HMAC Received from Rezonate}
4. Signature Header Name: Keep the default value (X-Cs-Primary-Signature)
5. Save configuration
5. Navigate to Fusion workflows > All workflows\

6. Click Create workflow
7. Click Create Workflow from scratch on the new page and then click Next.
8. In the “Create workflow dialog, choose Event as the workflow trigger and click next.\

9. In the “Select trigger” dropdown box, choose Alert. Choose the subcategory to be “EPP Detection”, and click next.\

10. On the right side of the “Create workflow” dialog, click the + button next to the trigger box.\

11. Click on “Add action”
12. In the workflow dialog, choose Notify.\

13. Choose “Call webhook”.
14. In the Webhook name, choose the new “Rezonate Webhook”.
15. In data to include, choose the following data points:
1. Alert ID
2. Behavior timestamp
3. Command Line
4. Description
5. Executable SHA256
6. File Path
7. Name
8. Sensor platform
9. Sensor hostname
10. Sensor domain
11. Sensor local IP address
12. Sensor external IP address
13. Sensor Host ID
14. Severity
15. Tactic
16. Technique
17. User name
18. User ID
19. Action Taken

16. Now click next and finish.
17. Name the workflow as “Rezonate Workflow”
18. Turn the workflow status to On
19. Save workflow
### Integrate through API Key
To Integrate, please perform the following actions after authenticating to CrowdStrike as a **Falcon Administrator**
1. Navigate to Support and Resources> API clients and keys\
\

2. Click on “Create API client”\
\

3. Configure the following:
1. Client name - “Rezonate Integration”
2. Description - “API key used by Rezonate”
3. Scopes:
1. Alerts - Read
2. Detections - Read
3. Hosts - Read
4. IOC Management - Read, Write
5. IOCs (Indicators of Compromise) - Read, Write
6. OPTIONAL: Discover - Read

4. Click Create.
5. Copy the Client ID, Secret, and Base URL and share them back with Rezonate.\
# Slack Integration
This document describes how to integrate the Rezonate product with Slack, which provides IAM observability to users, groups, channels, and configurations as well as detection of different security risks.
To Integrate, please perform the following actions after authenticating to Slack with Org Admin.
1. Browse to and click **Create** **New** **App**, and select "From an app manifest"\
\
\
2. Select your workspace, paste the code below instead of the current json, and click next.\
```
{
"display_information": {
"name": "Rezonate Integraation"
},
"features": {
"bot_user": {
"display_name": "Rezonate Integraation",
"always_online": false
}
},
"oauth_config": {
"scopes": {
"bot": [
"channels:read",
"groups:read",
"team.billing:read",
"team.preferences:read",
"team:read",
"users.profile:read",
"users:read",
"users:read.email",
"im:read",
"mpim:read"
]
}
},
"settings": {
"org_deploy_enabled": false,
"socket_mode_enabled": false,
"token_rotation_enabled": false
}
}
```
3. Click the Create button, then on the application page click Install to Workspace, and then click Allow.
4. Now click the **Add Features and Functionality**, **permissions**
5. Copy the token and share it back with Rezonate Integration Wizard.\
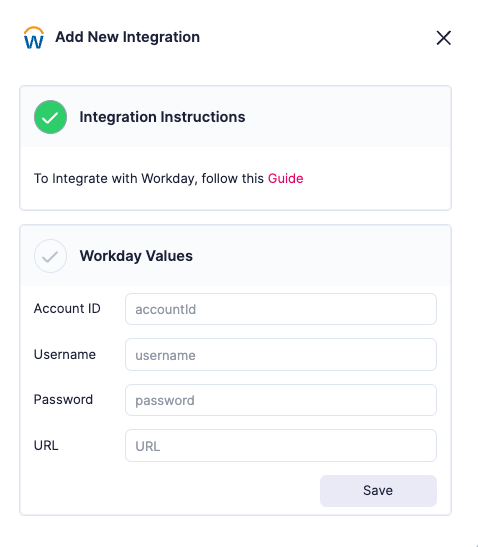
# Workday Integration
The HR data from Workday plays a crucial role in managing identities and ensuring the security of these identities within your organization.
With the Workday integration, Rezonate can correlate HRIS information to the actual identities in your Identity Provider, identifying security policy breaches (Such as active access for terminated employees, and enriching identity-centric context).
The primary steps to accomplish this task within Workday are outlined as follows:
1. Create a Workday Integration System User.
2. Create the custom report, and enable the report as a web service in Advanced settings
3. Set the user created in the first step (our ISUE) as the report owner in the Share settings.
4. Save the configuration at the Rezonate Platform
#### Step #1 - Create Workday Service User
To create the integration system user, proceed as follows:
1. Navigate to your Workday tenant and type 'create integration system user' into the search bar. Then, under the Tasks & Reports section, select the 'Create Integration System User' option.
2. Enter a username and password for the new user.
3. Do not check the *Require New Password at the Next Sign In* option.
4. For Session Timeout Minutes, enter 0, and select the "Do not Allow UI Sessions" option.
5. Click OK.
Verify that the ISU established earlier is included in the required security groups within Workday, enabling it to be the owner of the report that will be created in the subsequent step.
**Step #2 Create Custom Report**
Create a custom Workday report configured as follows:
* Report type - *Advanced*
* Data source - *All users* (Make sure to include all user types)
* Data source type - *Standard*
* Primary business object - *Worker*
Incorporate the columns listed below into the report, arranging them in the specified order.
1. email
2. first\_name
3. last\_name
4. business\_title
5. active
6. city
7. state
8. country
9. user\_id
10. middle\_name
11. nickname
12. org\_name
13. super\_ref - (Manager ID)
14. managername
15. position\_title
16. division
17. hire\_date
18. termination\_date
19. category
{% hint style="info" %}
the created user needs to have access to the data rendered in the report.
{% endhint %}
After selecting the columns, Enable this Report as a Web Service from the Advanced tab.
Verify that the ISU user, established previously, is designated as the **Owner of the report** within the Share tab.
**Step #3 - Integration in Rezonate**
After creating the report, open the list of **Report URLs**, right-click, and copy the **JSON** URL link. Please paste it into the integration form on the product integration page.
Key
Info
Account ID
Any preferred name for the integrated account: Example: workday
Username
The username that has access to the recently created report
Password
The password for that username
URL
The url to the recently created report
# BambooHR Integration
Bamboo's HR data plays a crucial role in managing identities and ensuring their security within your organization.
With the BambooHR integration, Rezonate can correlate HRIS information to the identities of your identity providerin your Identity Provider, identifying security policy breaches (such as active access for terminated employees) and enriching identity-centric context.
{% hint style="info" %}
In this Integration Rezonate has limited read-only access to a subset of the employee's attributes, without access to sensitive HR information such as salaries or contracts.
{% endhint %}
## Integration Steps
### Creating the Access Level (Role)
1. Sign in to your Bamboo Console, with a privileged user and click on the settings button.
2. Select "Access Levels" in the menu.
3. Select "Create a **Custom** Access Level"
4. In the Access Level Name - write "Integration Access", you can leave the description empty.\
5. In the next step (What this Access Level can do), keep it **empty** and click **Next**.
6. Under the "What this Access Level Can See" select the following:\
**Personal**
1. Basic Info - View Only
2. Address - View Only
3. Contact - View Only
4. Social Links - View Only
5. Education - View Only
**Job:**
1. Hire Date - View Only
2. Original Hire Date - View Only
3. Employment Status - View Only
4. Job Information - View Only
Its highly recommended to exclude SSN from the list of fields, and can be easily done by expanding the Basic Info, clicking on SSN, and changing to "No Access"
After setting the access level, click on the **Save & Finish** button at the bottom of the screen\
\
\_\_\_\_
### Creating a Service-Account User
After we have defined the limited Role, we will need to create a user to be used as a service account.\
To do that, click on the recently-created access level, and click on the settings button.\
**Select "Add a Non-Employee BambooHR User.**
If necessary, you can create an **email alias** for the integration, as you will need to confirm the selected email. in the username, info write the following: First Name: **Rezonate**, Last Name: **Integration**.
After creating the user, you'll have to confirm the email and set a password.\

After setting a password, sign in to the Integration user account and select the profile button. \
Then Click on **API Keys.**\

Generate an API Key and copy it. \

Now, Browse into Rezonate and go to the integration section, under the settings.\
Click "Add Integration" and select BambooHR.
Field
Value
API Key
Place your recently created-api key
Company Domain
The company domain used to access your account (If you access BambooHR at https://mycompany.bamboohr.com, then the company domain is “mycompany”)
\

Thats It! you have finished the process. :boomerang:
### The Data is being collected by Rezonate
As mentioned, Rezonate has limited access to Employee reports, **without** sensitive salary information or contracts. below is the list of the actual fields in the report that is collected
```json
export const customFormat = {
title: 'Rezonate Report',
fields: [
'id',
'acaStatus',
'acaStatusCategory',
'address1',
'address2',
'age',
'bestEmail',
'birthday',
'city',
'country',
'createdByUserId',
'dateOfBirth',
'department',
'division',
'employeeNumber',
'employmentHistoryStatus',
'firstName',
'fullName1',
'fullName2',
'fullName3',
'fullName4',
'fullName5',
'displayName',
'gender',
'hireDate',
'originalHireDate',
'homeEmail',
'homePhone',
'flsaCode',
'jobTitle',
'lastChanged',
'lastName',
'location',
'maritalStatus',
'middleName',
'mobilePhone',
'preferredName',
'state',
'stateCode',
'status',
'supervisor',
'supervisorId',
'supervisorEId',
'supervisorEmail',
'terminationDate',
'workEmail',
'workPhone',
'workPhonePlusExtension',
'workPhoneExtension',
'zipcode',
],
};
```
# Snowflake Integration
Snowflake Integraiton Guide
This document describes how to integrate the Rezonate product with Snowflake, which provides IAM observability to users, groups, roles, and resources as well as detection of different security risks and threats.
{% hint style="info" %}
If your Snowflake tenant has an IP Restrictions policy, you will have to whitelist Rezonate's collector IP Address. More information available [Collectors IP Ranges](/troubleshooting-and-support/collectors-ip-ranges)
{% endhint %}
### Integration Steps (In Snowflake Side)
To integrate, please log-in with a privileged user and perform the following actions
1. Create a new role for Rezonate integration
```
CREATE ROLE rezonate_integration
COMMENT = 'Rezonate Integration Role';
```
2. Create a new role for Rezonate to log in through to utilize the role. Please replace the PLEASE-**PLEASE-PUT-YOUR-PASSWORD-HERE** With a random string that will be used as the password.
```
CREATE OR REPLACE USER rezonate_integration_user
DISABLED = false
MUST_CHANGE_PASSWORD = false
DEFAULT_ROLE = rezonate_integration
COMMENT ='rezonate_integration_user'
LOGIN_NAME = 'rezonate_integration_user'
PASSWORD = 'PLEASE-PUT-YOUR-PASSWORD-HERE'
```
In case of Certificate based authentication, Execute the following instead
```
CREATE OR REPLACE USER rezonate_integration_user
DISABLED = false
MUST_CHANGE_PASSWORD = false
DEFAULT_ROLE = rezonate_integration
COMMENT ='rezonate_integration_user'
LOGIN_NAME = 'rezonate_integration_user'
RSA_PUBLIC_KEY='MIIBIjANBgkqhkiG9w0BAQEFAAOCAQ8AMIIBCgKCAQEAh5+IBytPTbsKs3ajcn7H
Mhy5JpmQmiqMWKfiJCa1iFYBnEnOHS/ZzUpkZRXflWoOYGnKyPlqSFOW14EJvec2
iBODm36nD6z7dFz3q9tBjzjjLRPDWwLSScBkIv5Zx5QzopcNoZDa0FyEe72Jk99+
e5Xxr+Hy+zmX3+/Fv0HPbWmG6IQXCN6V1uLY5B4V2xo0PFDFUw7pnGzYTQhmn3VT
+SJEJ9i3FY6ZPcjUjfz1UP+v1KJO7ZbQANqHLwDMv5j0ETvRNdj6MtAjRo9kwZl1
PIXFbRYYtFAo2nf+qqmOtQc7NSqgT+uKcfnFjzyt9Salzf3ISSu2r6XXOh8+cBUg
KwIDAQAB'
```
3. Grant Rezonate the privileges to query against the information metadata db
```
GRANT imported privileges on database snowflake to role rezonate_integration;
```
4. Grant Rezonate the privileges to "USAGE" a warehouse in the database. please replace **$WAREHOUSE\_NAME\_HERE$** with one of the warehouses in the database.
```
GRANT USAGE ON WAREHOUSE $WAREHOUSE_NAME_HERE$ TO ROLE rezonate_integration;
```
5. Grant Monitor Access (To support querying federation information and security settings)
```
USE DATABASE SNOWFLAKE;
GRANT MONITOR ON ACCOUNT TO ROLE rezonate_integration;
GRANT APPLICATION ROLE TRUST_CENTER_VIEWER TO ROLE rezonate_integration;
```
5. Grant Rezonate with the ability to use the Rezonate role
```
GRANT ROLE rezonate_integration TO USER rezonate_integration_user
```
6. You will also need to provide the URL for your tenant ID. To extract its value please go to settings, tenant information and then click on the "Copy link" to show your URL
### Integration of the Creation user to Rezonate
After creating the required privileges, go to the Rezonate integration screen. select Snowflake and fill in the following information:
| Required Property | Value |
| ----------------- | ---------------------------------------------------------------------------------------------- |
| username | created username (**rezonate** is default) |
| password | your selected password (If selected Certificate, you will need to fill the public key instead) |
| account |
your snowflake id, in the following format: account.region
|
| warehouse | the warehouse that was enabled for the user. |
| role |
the created role name (default is rezonate\_integration)
|
# LastPass Integration
{% hint style="info" %}
Note: To access data, you need to grant roles or permissions that include write capabilities, but the Rezonate integration **only reads data** from the application.
{% endhint %}
Integrating with LastPass can give Rezonate visibility into identities, roles, and posture controls.
### Integration Steps
To integrate Rezoante with LastPass, Rezonate needs the following values:
* LastPass client id (cid)
* LastPass provisioning hash (API Key)
To get those please follow the following steps:
1. Log in to the LastPass admin console
2. In the top menu, choose Dashboard
3. From the left menu, click **Security Dashboard**
4. Keep note of account number value at the top of the page\
Example for Account id
5. To capture the provisioning hash click on Advanced in the upper menu and select **Enterprise API.**
6. Create a provisioning hash, and keep note of it (As you will only see it once).
{% hint style="info" %}
if you have already created provisioning hash in the past, you'll need to get it from the original creator or reset it (which may break other federations that rely on it)
{% endhint %}
Message that may be shown if hash was already created
Paste the recently created information (Hash & Client ID) in the Rezonate integration Form
# SentinelOne integration
This document describes integrating the Rezonate product with SentinelOne, which provides observability to on-premise hosts, users, and detection data.
### Create Integration In Rezonate
Get your Webhook authentication Rezonate, this can be done via the Integrations Interface or Prelude CLI. Save generate-webhook output to be used in the following steps. To generate the webhook:
* Click on the settings button on the top right menu.
* Click on the Integration panel in Rezonate and then "New Integration".
* Select S1 Integration and click Connect.
* Select a name for the new integration (it can be any name) and click Save.
* Take note of the webhook URL, we will use it in the next step.
### Create Webhook Destination in S1
* Select Singularity XDR Webhook, and click Configure.
* Click and expand the dropdown menu:
* Select the box under **Response Actions**: **Make "Hooks" available as "Manual Response Actions" from Threats**
* Select the Name for the configuration.
* Select **"Options for triggering" and** Paste the webhook created in Step 1 to the **URL field**
* Select POST in **Action,** and choose **Full Threat Details** in **Webhook Request Body**
* Insert the following header into the **Headers**
```
{"Content-Type": "application/json"}
```
* Select **Always Send body**
* Click **Next**
* Select your organization and site in the **Access Level**
* Click **Install**.
# SAP Cloud Platform Integration
{% hint style="info" %}
This integration is currently in Beta and available to selected customers
{% endhint %}
For the full integration docs for this integration, please reach out to your Rezonate point of contact.
# GitLab Integration
Generate a Personal Access Token
1. **Log in to GitLab**: Go to your GitLab instance and log in with your account.
2. **Navigate to Personal Access Tokens**: Click on your profile picture in the top-right corner and select "Settings". On the left sidebar, find and click "Access Tokens".
3. **Create a Token**:
* **Name**: Give your token a descriptive name.
* **Scopes**: Select read\_api, read\_user, read\_repository, read\_registry
* **Expiration Date**: Set an expiration date 1 year from now.
4. **Save Token**: Click "Create personal access token". Make sure to copy the token, as it will only be displayed once.
Sign-in to Rezonate, and through the integration area add GitLab and place your recently created key.
# Oracle NetSuite Integration
Integrating NetSuite expands Rezonate authorization graph visibility as well as the ability to monitor security controls for SSO-Access, Identity posture status, and more.
### Integration Steps
First, we will need to create a new custom role, to do that please follow the following steps as a NetSuite administrator:
1. On the admin page, navigate to Setup > Users/Roles > Manage Roles > New.

2. Name the role “**Rezonate Integration Role**”.
3. In the permissions section, assign the following:
1. Lists: Departments - View
2. Lists: Employee Record - View
3. Lists: Employees - View
4. Lists: Events - View
5. Reports: Account Detail - View
6. Setup: Set Up OpenID Connect (OIDC) Single Sign-On - Full
7. Setup: Set Up OpenID Single Sign-on - Full
8. Setup: Set Up SAML Single Sign-on - Full
9. Setup: Two-Factor Authentication Base - View
10. Setup: View Login Audit Trail - View
11. Setup: View Web Services Logs - View
12. Reports: SuiteAnalytics Connect - Read All - View
4. Save the role record.
Now we will need to create an **integration** and assign it to the role that was created:
1. On the admin page, navigate to Setup > Integration > New.
2. Name the application “**Rezonate Integration”**.
3. Set the state to Enabled.
4. In the Authentication section, configure the following:
5. Select Use Client Credentials (Machine To Machine) flow\

6. The application requires access to:
1. REST Web Services
2. SuiteAnalytics Connect
7. **After saving, take note of the ClientID and Client Secret, we will need them later.**
**Creating a new OAuth Client Credentials**
Now that we have the integration and role, we will need to assign a certificate and enable the OAuth M2M Authentication flow.
1. On the admin page, navigate to Setup > Integration > Manage Authentication > OAuth 2.0 Client Credentials (M2M) Setup.

2. Click on Create new.

3. Configure the following:
1. Application - Rezonate Integration (the new integration record from section 2)
2. Role - Rezonate Role (the new role from Section 1)
3. Entity - Choose the entity in your organization that is responsible for this integration
4. Upload the following certificate -
5. auth-cert.pem
{% file src="/files/PkrU7Kep5ZxFIQO0C8B2" %}
Thats it!
**Please share back with Rezonate the following information:**
* **ClientID** + **ClientSecret** as noted from the previous stage.
* **Organization ID** *(required)* - NetSuite account ID (company identifier). \
The company parameter is a NetSuite-specific parameter. Extract only the **company ID** from `https://COMPANY_ID.netsuite.com`
# Atlassian Cloud Integration
Integrating with Atlassian can give Rezonate visibility into identities, roles, and posture controls.
### Integration Steps
To integrate Rezoante with Atlassian, Rezonate needs the following values:
* Organization Id
* API Key
{% hint style="info" %}
Note: To access data, you need to grant roles or permissions that include write capabilities, but the Rezonate integration **only reads data** from the application.
{% endhint %}
To get those please follow the following steps:
1. Log in to [Atlassian’s admin portal](https://admin.atlassian.com/) as an organization admin.
2. From the top menu, navigate to Settings.
3. On the left menu, click on API keys.

4. Click on **Create API Key**

5. Name the key “Rezonate Integration”.
6. Set the expiration date to **one year** from now.
7. Click on Create.

8. Share the Organization ID and the API key with Rezonate\

# Zendesk Integration
Integrating with Zendesk can give Rezonate visibility into identities, roles, and posture control detection.
## Integration Guide
### Creating Access in Zendesk
1. To start, sign in to Zendesk using an administrative account and go to the **Admin Center**
2. Navigate to Apps and integrations > APIs > ZenDesk API
3. Select "Add API Token"
2. In the API token description (optional) - Write down "Rezonate Integration".
3. Copy the recently created API token.
4. In the Rezonate integration page, select Zendesk and paste the following:
Attribute
Info
Example
Sub Domain
The subdomain is associated with the Zendesk tennat.
if the tenant url is rezonate.zendesk.com the subdomain is rezonate
User name
The user name that was used to create the API Token
ori@rezonate.io
API Token
The Created API Token
5B97vM5T4aWx2........
# HiBob Integration
HiBob HR data plays a crucial role in managing identities and ensuring their security within your organization.
With the HiBob integration, Rezonate can correlate HRIS information to the identities of your identity providerin your Identity Provider, identifying security policy breaches (such as active access for terminated employees) and enriching identity-centric context.
{% hint style="info" %}
In this Integration Rezonate has limited read-only access to a subset of the employee's attributes, without access to sensitive HR information such as salaries or contracts.
{% endhint %}
## Integration Steps
#### Creating the credentials in HiBob
1. Create an API Service User ([Doc's from HiBob here](https://apidocs.hibob.com/docs/api-service-users))
2. Create a new permission group ([Docs from HiBob here](https://help.hibob.com/hc/en-us/articles/4409776408209))
3. Add the Service user to the group ([Docs from HiBob here](https://help.hibob.com/hc/en-us/articles/27875098648465-Manage-service-users#h_01J6C37F8YYC637Y5HR4RA6H1H))
4. Take note of the credentails and assign permissions for them as defiend below:
5. Set permissions to the permissions group
1. Under Features -> People select the following:
1. View the company clubs View
2. View the company's people directory
2. Click the People Data -> People. Select Everyone (for access Rights)
3. Select People and Enable read access for Basic Info, About.
#### Integrating from the Rezonate Side
In the integrations page, select HiBob and add a new integration. fill in the created credentials and submit.
{% hint style="success" %}
Regarding Account ID - It's just an alias for the integration name, any input is valid.
{% endhint %}
# Microsoft Defender Integration
Incoming webhook integration with Microsoft Defender for Endpoint
{% hint style="info" %}
This integration requires a **Microsoft** **Power Automate** license for the owner-user
{% endhint %}
Configuring this integration enables Rezonate's ITDR engine to cross-correlate identity threats from Endpoint detections, and to improve MTTR.
### Configuration Guide
To set up the integration please follow the following steps:
1. Browse to the Rezonate integrations screen, add a new Integration, and select Microsoft Defender. Pick a name for the application and copy the webhook URL that appears on the integration screen. Take note of it as we will use it later in the microsoft configuration part.\
2. Browse to [https://flow.microsoft.com](https://flow.microsoft.com/) and Click **Create.**
3. Click on the **All Connectors** button at the bottom right of the page, search for “ATP” and select the Microsoft Defender ATP app.
4. After that, select “Triggers - Trigger when new WDATP alert occurs”.
5. A new block will appear on the board, with an Invalid connection error below it.
6. To authenticate with a licensed user, and authorize Power Automate’s access request to your tenant’s data, on the right side menu, look for an option to sign in to Microsoft Defender to set up the connection. \

7. A popup window will open, choose your licensed user and then authorize the application’s access request.\
\

8. Now authorized, inside the workflow board, click the + icon below the Defender block and add an action.
9. Search for “HTTP webhook”.\

10. Select HTTP Webhook (first option), and Click the new webhook block, to set up the parameters, including the target URL that you copied from Rezonate.

15. Save your flow by clicking the Save button.\

16. Head back to the main menu of Power Automate and find your flow under My Flows.\

17. Click the 3 dots icon and more commands, and a menu will appear, choose Turn on to enable the new flow.
# Docusign Integration
Integrating with DocuSign can give Rezonate visibility into identities, roles, and posture controls.
## Integration Instructions
DocuSign requires read-only permissions that are being granted through OAuth integration. This can be done simply by browsing to the Rezonaate integrations page, selecting DocuSign, and clicking Authorize.
This will redirect to the DocuSign authorization page
Click Allow Access, and you'll be redirected to the Rezonate platform.
***
#### Annex 1. Required Permissions
* Read account details.
* Read the details of a user.
* Read a list of permission sets on an account.
* Read a list of groups on an account.
* Read the identity provider details of the organization.
* Read the domain details of the organization.
* Read organization details and accounts linked to the organization.
* Create and send envelops. Obtain links for starting signing sessions (Not in use)
# Mongo Atlas Integration
MongoDB Atlas Integration guide:
1. Navigate to the MongoDB Atlas console at .
2. Sign in with an administrative user.
3. Use the Access Manager dropdown menu and choose the organization to create the integration for:
Select Organization, MongoDB
4. In the organization access manager, navigate to the API keys tab:
API Keys
5. Click Create API Key:

6. In the form, fill in a short description such as “Rezonate Integration” and assign the key to one of the following roles:
7. 1. **Organization Owner**: this role grants Rezonate root access to the organization, including access to administer organization settings, users, and teams; access to delete the organization, and all permissions granted to the roles that are below it. This role is required to view information regarding federation and advanced access settings. This role does not expose Rezonate to sensitive data or data stored in the databases.
2. **Organization Member**: This role grants Rezonate read-only access to everything in the organization, including all projects. This role does not expose Rezonate to sensitive data or data stored in the databases.
Create API Info
7. Click Next.
8. Copy the public key and the private key and paste it into Rezonate’s integration page.
9. Click Done.
10. Click the settings wheel icon next to the organization name: 
11. Copy the organization ID from the page that opens: 
12. Paste the ID in Rezonate’s integration page to complete the process.
13. Your integration with MongoDB Atlas will be added to Rezonate and your data will be collected shortly.
# Ping Identity One Integration
**PingFederate** is an enterprise-grade identity federation server developed by Ping Identity. It provides single sign-on (SSO), multi-factor authentication (MFA), and identity federation capabilities, enabling secure and seamless access to applications and services across organizational boundaries.
Integrating Rezonate into Ping enables Rezonate to map privileges and identities, access logs, and effective access managed through this Identity Provider.
{% hint style="info" %}
This integration is currently in beta, to integrate it into Rezonate please follow the documentation below and share the results with the Rezonate account manager
{% endhint %}
### Integration Steps
1. Sign in to Ping Administrative Console, with a privileged user and create a new application.
2. Fill in the following information:
1. Application Name: Rezonate Integration
2. Application Type: **Worker.**
3. Click Save. You will be redirected to the manage page for the recently created application.
4. Toggle the application and **enable it**.
5. From the Overview, copy and take note of the following:
1. Environment ID
2. Client ID
3. Client Secret\
Screenshot from Ping Management Screen
6. Click on the Configuration Tab, and click on the Edit button. Make sure that it is configured as follows:
7. Click on the Roles tab and then "Grant Roles"\
8. Select the following Roles, across your entire Organization
1. Configuration Read Only
2. DaVinci Admin Read Only
3. Identity Data Read Only
Click Save & Share back the recently noted information (Client ID, Client Secret, Env. Id)
# Generic HRIS Integration
Rezonate's Generic HRIS Connector allows pooling data from any Web server that has a valid CSV Format, and can provide an alternative for any directly-unsupported HRIS tool.
1. In order to use it, browse to the Settings tab, and select GenericHRIS.
2. In the form, fill the URL to the file (and Basic Authentication header as needed).
{% hint style="info" %}
since this integration is considered advanced, please reach out to the Rezonate team for additional support and technical guidance.
{% endhint %}
# Notifications & Alerts
# Slack Integration
Rezonate's Slack integration enables your team to receive timely alerts and information directly in a designated Slack channel.
This integration ensures that your team stays informed about important changes and potential security risks & threats within your environment, enhancing your organization's identity protection capabilities.
### Configuring Slack Channel & Incoming Webhook
For the integration, you will need an Incoming Webhook receiver in Slack. information regarding the process can be found on [Slack documentation](https://api.slack.com/messaging/webhooks). After performing the steps as described in their documentation, please keep note of the **Webhook URL**.
### Adding integration in Rezonate
To enable this integration, click the setting button on the top right corner of the application.\
In the settings, select Accounts & Integrations, and then pick **External Integrations**.
Click on **New Integration** and select Slack.
In the opened window, please fill in the following:
* Name = The name for this integration channel (It can be anything)
* URL = The Webhook URL that you have previously created.
Note that before saving the integration, you can click on **Test Integration** which will send an example message to that channel.
External Integration Form, Rezonate.
# HTTP Webhook Integration
Rezonate's HTTP Webhook integration enables your team to integrate into any external system supporting HTTP Incoming webhooks.
This integration ensures that your team stays informed about important changes and potential security risks & threats within your environment, enhancing your organization's identity protection capabilities.
### Adding Webhook integration in Rezonate
To enable this integration, click the setting button on the top right corner of the application.\
In the settings, select Accounts & Integrations, and then pick **External Integrations**.
Click on **New Integration** and select Webhook.
In the opened window, please fill in the following:
* **Name** = The name for this integration channel (It can be anything)
* **URL** = The Webhook URL that you wish to send data to
* API KEY = Optional API Key header for verification.
* **Skip SSL Verification** = Optional setting to ignore SSL errors.
Note that before saving the integration, you can click on **Test Integration** which will send an example message to that URL.
# Webhook Alert Example - Saved Search
```json
{
"link": "$_LINK_TO_SEARCH_RESULTS$",
"organization": "$ORGANIZATION_NAME$",
"total": $NUMBER_OF_NEW_RESULTS$,
"entities": [
{
"link": "$LINK_TO_RESULT_ENTITY$",
"metadata": {
"type": "$ENTITY_TYPE$",
"i18n_type": "$ENTITY_TYPE_HUMAN_READABLE$",
"i18n_pluralType": "$ENTITIES_TYPES_HUMAN_READABLE$",
"i18n_category": ""
},
"accountName": "$RELEVANT_ACCOUNT_ID$",
"entityName": "$ENTITY_NAME$",
"fields": {
// The attributes of the result entity based
//on the type of entity that was related to the saved search
"$FIELD_NAME$": {
"value": "$FIELD_VALUE$",
"type": "$FIELD_TYPE$"
}
}
}
]
}
```
# Webhook Alert Example- ITDR
```json
{
"organization": "$tenant_id$",
"account": "$account_id$",
"data": {
"integrationByLocale": {
"en": [
"$integration_id_that_the_alert_sent_through$"
]
},
"type": "SecurityIssue", // The Type of alert
"data": {
"securityIssueEntity": {
"id": "$id_of_incident$",
"account": "$account_id$",
"category": "$category_in_case_of_exposure$",
"type": "$type_in_case_of_exposure"
},
"securityIssueAlert": {
"id": "$id_of_alert$"
},
"threatMetadata": {
"organization": "$org_name$",
"link": "$alert_link_in_rezonate$",
"title": "$title_of_threat$",
"description": "$description_of_threat$",
"firstSeenTime": $unix_time_first_seen$,
"lastModificationTime": $unix_time_last_update$,
"severity": "$risk_level$",
"compromisedEntity": "$identity_identifier_of_compromised_incident$",
"involvedAccountIds": [
"$accounts_involved$"
],
"accountId": "$account_involved$",
"threatPlatforms": [
"$platforms_involved$"
],
"MitreTactics": [
"$mitre_tactics_detected$"
],
"ThreatsInvolvedEntities": []
}
}
}
}
```
# Microsoft Teams Integration
Rezonate's Microsoft Teams integration enables your team to receive timely alerts and information directly in a designated channel.
This integration ensures that your team stays informed about important changes and potential security risks & threats within your environment, enhancing your organization's identity protection capabilities.
### Configuring Teams & Incoming Webhook
For the integration, you will need an Incoming Webhook receiver in Teams. information regarding the process can be found in [Microsoft documentation](https://learn.microsoft.com/en-us/microsoftteams/platform/webhooks-and-connectors/how-to/add-incoming-webhook?tabs=newteams%2Cdotnet). After performing the steps as described in their documentation, please keep note of the **Webhook URL**.
### Adding integration in Rezonate
To enable this integration, click the setting button on the top right corner of the application.\
In the settings, select Accounts & Integrations, and then pick **External Integrations**.
Click on **New Integration** and select Microsoft Teams.
In the opened window, please fill in the following:
* Name = The name for this integration channel (It can be anything)
* URL = The Webhook URL that you have previously created.
Note that before saving the integration, you can click on **Test Integration** which will send an example message to that channel.
integration screen, Rezonate Platform.
# Torq Integration
Rezonate's Torq integration enables your team to receive timely alerts and information directly in a designated webhook channel, initiating workflows and actions in Torq.
This integration ensures that your team stays informed about important changes and potential security risks & threats within your environment, enhancing your organization's identity protection capabilities, and will have the ability to respond based on them.
### Configuring Torq Incoming Webhook
For the integration, you will need an Incoming Webhook receiver in Torq. information regarding the process can be found in [Torq documentation.](https://learn.torq.io/docs/webhook#:~:text=Torq%20webhooks%20recognize%20several%20content,not%20be%20transformed%20or%20structured.) After performing the steps as described in their documentation, please keep note of the **Webhook URL**.
### Adding integration in Rezonate
To enable this integration, click the setting button on the top right corner of the application.\
In the settings, select Accounts & Integrations, and then pick **External Integrations**.
Click on **New Integration** and select Torq.
In the opened window, please fill in the following:
* Name = The name for this integration channel (It can be anything)
* URL = The Webhook URL that you have previously created.
Note that before saving the integration, you can click on **Test Integration** which will send an example message so you can test it in Torq.
# Email Integration
Rezonate's email integration enables your team to receive timely alerts and information directly to an email address.
This integration ensures that your team stays informed about important changes and potential security risks & threats within your environment, enhancing your organization's identity protection capabilities.
### Adding integration in Rezonate
To enable this integration, click the setting button on the top right corner of the application.\
In the settings, select Accounts & Integrations, and then pick **External Integrations**.
Click on **New Integration** and select Email.
In the opened window, please fill in the following:
* Name = The name for this integration channel (It can be anything)
* Email = The target email to send alerts to.
Note that before saving the integration, you can click on **Test Integration** which will send an example message to the target email.
Email integration, Rezonate Platform
***
### Examples of received messages
After setting up the integration, we can bind it with Saved Queries, Threat alerts, and many other platform events.\
\
Below is an example of an incoming threat alert, configured through this channel
# Splunk Integration
Rezonate's Splunk integration enables your team to receive timely alerts and information to and execute workflows and analysis based on them in Splunk.
This integration ensures that your team stays informed about important changes and potential security risks & threats within your environment, enhancing your organization's identity protection capabilities.
### Configuring Splunk HTTP Event Collector
For the integration, you will need an HTTP Event collector configured in Splunk. information regarding the process can be found on [Splunk documentation](https://docs.splunk.com/Documentation/Splunk/9.0.4/Data/UsetheHTTPEventCollector). After performing the steps as described in their documentation, please keep note of the Webhook URL and Authorization Token.
### Adding integration in Rezonate
To enable this integration, click the setting button on the top right corner of the application.\
In the settings, select Accounts & Integrations, and then pick **External Integrations**.
Click on **New Integration** and select **Splunk**.
**Fill out the form as follows:**
Please write down the Secret Token you received from Splunk during the creation process.
Note that before saving the integration, you can click on **Test Integration** which will send an example message to that channel.
Splunk integration screen, Rezonate Platform.
Thats it! now you can send Notifications and Alerts from any part of the platform to Splunk.
# Datadog Integration
Rezonate's Datadog integration enables your team to receive timely alerts and information to and execute workflows and analysis based on them in Datadog.
This integration ensures that your team stays informed about important changes and potential security risks & threats within your environment, enhancing your organization's identity protection capabilities.
### Configuring Datadog HTTP Event Reciever
For the integration, you will need an HTTP Event collector configured in Datadog. information regarding the process can be found on [Datadog documentation](https://docs.datadoghq.com/developers/guide/calling-on-datadog-s-api-with-the-webhooks-integration/). After performing the steps as described in their documentation, please keep note of the Webhook URL and Authorization Token.
### Adding integration in Rezonate
To enable this integration, click the setting button on the top right corner of the application.\
In the settings, select Accounts & Integrations, and then pick **External Integrations**.
Click on **New Integration** and select **DataDog**.
**Fill out the form as follows:**
* Name = The name for this integration channel (It can be anything)
* URL = Your incoming webhook receiver url
* API Key = The key that is authorized to post
Note that before saving the integration, you can click on **Test Integration** which will send an example message to that channel.
Thats it! now you can send Notifications and Alerts from any part of the platform to Datadog.
# PagerDuty Integration
Rezonate's PageDuty integration enables your team to receive timely alerts and information and to and execute workflows and analysis based on them.
This integration ensures that your team stays informed about important changes and potential security risks & threats within your environment, enhancing your organization's identity protection capabilities.
### Configuring PageDuty Service & Integration Key
For the integration, you will need a Service & Integration configured in PagerDuty. information regarding the process can be found on [PagerDuty documentation.](https://support.pagerduty.com/docs/services-and-integrations#generate-a-new-integration-key) After performing the steps as described in their documentation, please keep note of the Webhook URL and Authorization Token.
### Adding integration in Rezonate
To enable this integration, click the setting button on the top right corner of the application.\
In the settings, select Accounts & Integrations, and then pick **External Integrations**.
Click on **New Integration** and select **PagerDuty**.
**Fill out the form as follows:**
* Name = The name for this integration channel (It can be anything)
* URL = Unless have a custom value, write: [https://events.pagerduty.com/v2/enqueue]()
* API Key = The routing\_key that you have defined in the Service creation process.
Note that before saving the integration, you can click on **Test Integration** which will send an example message to that channel.
Thats it! now you can send Notifications and Alerts from any part of the platform to PagerDuty.
# Jira Integration
Rezonate offers seamless integration with Jira. This feature is designed to streamline your workflow, especially in managing exposures and threats.
**Integrate Jira for Efficient Ticket Management**
You can leverage this integration to connect with other stakeholders in the company to resolve security Exposures quicker and connect to your eco-system.
**How It Works**
For first-time users, connecting their access to Jira from the Rezonate platform:
* In a specific Exposure or Threat in the Rezonate platform, click "Create Issues".
Example for Risk, with the Create Issue link for Jira ticketing
* In the opened screen, grant the necessary access to get started.
* Once you approve the connection between Rezonate and Jira, you'll unlock a range of functionalities. Rezonate will have the capability to:
**View Capabilities:**
* Access various Jira elements including Application Roles, Audit Records, Avatars, Issue Comments, Field Configuration Schemes, Groups, Issue Type Hierarchies, Issue Types, Issues, Project Categories, Versions, Components, Properties, Projects, Users, and more.
* See detailed Issue information like Field Values, Worklogs, Attachments, Changelogs, Links, Priorities, Votes Count, Watchers, Labels, Priorities, Resolutions, Statuses, Field Default Values, Options, and Fields.
**Update Capabilities:**
* Modify elements such as Issue Comments, Issues themselves, Attachments, and Issue Comment Properties.
For a better understanding of how this integration enhances your workflow, check out this informative video. It guides you through the integration process and showcases the practical benefits of connecting Rezonate with Jira.
{% embed url="" %}
# Troubleshooting & Support
# Collectors IP Ranges
{% hint style="info" %}
Customers using IP Whitelisting are required to whitelist Rezonate's data collectors.
{% endhint %}
| IP | ASN | Purpose |
| ---------------- | ----------------------------------- | --------------- |
| `18.185.232.76` | Amazon.com, Frankfurt, Germany (DE) | Data Collectors |
| `35.157.109.233` | Amazon.com, Frankfurt, Germany (DE) | Data Collectors |
# Data Processing
This document describes the data types that are being collected and processed by the platform.
Rezonate collects and analyzes various types of information to fulfill its tasks and goals. \
For this document, collected data will be divided into 3 main types:
* **Identities and their profile information** - This information includes the existence and configuration of identities that have access to the environment. The information includes identification details such as full names, emails, organizations, position titles, and other data points, as they are stored in the integrated platform directory.
* **Authentication and Authorization Configurations** - This information includes the existence and configuration of global tenant policies, roles, applications, group assignments, role assignment, and conditional access policies.
* **Resources and their configuration** - This information varies per integrated platform and is described in more detail per integration.
* **Activity Logs -** The activity log of the integrated platform. These logs contain information regarding activities performed by actors (users or machines) in the environment and their context. From a data-point perspective, the collected information contains the identification of the identity that acted, along with IP address, and device information if available (Machine ID)
The data that is collected is used by Rezonate to discover and map the identities that have access to the environment, their effective privileges and access to resources, their behavioral profile, and security risks and threats that relate to them.
### Collected Data Points by Platform
* [AWS](/troubleshooting-and-support/data-processing/aws)
* [Azure Active Directory](/troubleshooting-and-support/data-processing/azure-active-directory)
* [Azure Cloud](/troubleshooting-and-support/data-processing/azure-cloud)
* [Google Workspace](/troubleshooting-and-support/data-processing/google-workspace)
# AWS
This document describes in details the data that is being collected by Rezonate as part of it AWS Integration
**Activity Logs & Alerts:**
* CloudTrail Logs ( full reference [here](https://docs.aws.amazon.com/awscloudtrail/latest/userguide/cloudtrail-event-reference.html) )
* GuardDuty Findings & Alerts (If enabled)
**Identities and their profile information & Configuration**
* Users (SSO & Locally Managed)
* Groups
* Roles
* Policies
* SAML\OpenID Providers
* Access Advisor Information
{% hint style="info" %}
Note that Assets Configuration & Discovery is Optional and can be disabled
{% endhint %}
**Assets Configuration** - The existence of the resource and its configuration (with no data access)
* ACM - Certificates
* API Gateway Resources (V1\V2)
* AutoScaling Resources
* CloudFormation Stacks
* CloudFront Resources
* CloudTrail Settings
* Cognito Identity Pools
* DocDB Resources
* DynamoDB Resources
* EC2 & Networking Resources
* ECR Resources
* ECS\EKS Resources
* ElasticCache Resources
* Elastic Load Balancer Resources (V1\V2)
* GuardDuty Alerts and Detectors
* Kafka (MSK, KafkaConnect) Resources
* Lambda Functions & Layers
* Log Groups
* Neptune Databases
* Organizational Structures & Account Owners
* Security Hub Controls & Findings
* SNS, SQS Resources
* SSM Commands & Agents
* WAF (V1\V2)
* Workspaces Resources
* RDS Resources
* Route53
* S3 Buckets
* Secrets Manager (The existence of secret, no access to the secret itself)
* SES (v1\v2)
# Azure Active Directory
This document describes in detail the data that is being collected by Rezonate as part of its Azure Active Directory Integration
**Activity Logs & Alerts:**
* Sign-In Logs ( full reference [here](https://learn.microsoft.com/en-us/graph/api/signin-list?view=graph-rest-1.0\&tabs=http) )
* Directory Logs ( full reference [here](https://learn.microsoft.com/en-us/entra/identity/monitoring-health/concept-provisioning-logs))
* Risky Users Logs ( full reference [here](https://learn.microsoft.com/en-us/entra/id-protection/howto-identity-protection-investigate-risk#risky-users))
**Identities and their profile information & Configuration**
* Users (SSO & Locally Managed)
* Groups
* Service Principals
* Roles Definitions & Assignments
* Identity Providers
* External Federation
* Administrative Units
* Organization Information
* Authentication Methods
* Security Policies (Including Conditional Access Policies)
* Devices
* Named Locations
* Domains
* Applications
* OAuth Grants
* Teams Information
* Security Recommendations
{% hint style="info" %}
**Optional** Microsoft 365 Integration will also collect the following
{% endhint %}
* Sensitivity Labels
* Sensitive Drive Records
* Sites Information
# Azure Cloud
This document describes in detail the data that is being collected by Rezonate as part of its Azure Cloud Integration
**Activity Logs & Alerts:**
* Subscription Logs ( full reference [here](https://learn.microsoft.com/en-us/azure/azure-monitor/essentials/activity-log?tabs=powershell) )
**Identities and their profile information & Configuration**
{% hint style="info" %}
Many of the Identities and their profile information & Configuration are being collected as part of the [Azure Active Directory](/troubleshooting-and-support/data-processing/azure-active-directory) Integration.
{% endhint %}
* Classic Administrators
* Deny Assignments
* Subscription Hierarchy
* Deny Assignments
* Custom Cloud Roles
{% hint style="info" %}
Note that Assets Configuration & Discovery is Optional and can be disabled
{% endhint %}
**Assets Configuration** - The existence of the resource and its configuration (with no data access)
* Virtual Machines
* Workflows
* Apps
* Cloud Services
* Database Accounts
* Integration Accounts
* Network Managers & Interfaces
* Resource Groups
* Arc VM's
# Google Workspace
This document describes in detail the data that is being collected by Rezonate as part of its Google Workspace Integration
**Activity Logs & Alerts:**
* Sign-In Logs ( full reference [here](https://developers.google.com/admin-sdk/reports/v1/guides/manage-audit-login) )
* Alert Center Alerts ( full reference [here](https://developers.google.com/admin-sdk/alertcenter/reference/rest) )
**Identities and their profile information & Configuration**
* Users (SSO & Locally Managed)
* Groups and memberships
* Roles Definitions & Assignments
* External Federation
* Administrative Units
* Organization Information
* Authentication Methods
* Security Policies
* Devices (ChromeOS, Mobile) Information
* Domains
* SAML Applications
* OAuth Grants to 3rd Party applications
# SSO Integrations
# SSO Login - Okta
### Create an Okta OIDC Application
To connect your Okta tenant as an identity Provider in Auth0, you must create an OIDC application. In your Okta Admin Dashboard, create a new application.
Select Applications > Applications, and Create App Integration.

Select Create New App.
Choose OIDC as the Sign-in method. Choose Web Application as your Application Type.

Select Next.
Enter your App integration name.
Add your Auth0 tenant information callback URL in the Sign-in Redirect URIs field. Your Auth0 tenant is

Select Create and find your Client ID and Client Secret fields. Please share them with the Rezonate Team.

\
This document is based on the Auth0 Documentation ([here](https://auth0.com/docs/authenticate/identity-providers/enterprise-identity-providers/okta))
# SSO Login - AzureAd
{% hint style="info" %}
HINT: If you have already integrated [Azure Active Directory](/troubleshooting-and-support/data-processing/azure-active-directory) you can use the recently created Service Principal and just add the redirect URI.
{% endhint %}
### Register your app with Azure AD
To register your app with Azure AD, you can see Microsoft's [Quickstart: Register an application with the Microsoft identity platform](https://docs.microsoft.com/en-us/azure/active-directory/develop/quickstart-register-app).
During registration, configure the following settings:
Option
Setting
Supported account types
Accounts in this organizational directory only (Default Directory only - Single tenant)
Redirect URI
Select a Redirect URI type of Web, and enter your callback URL: https://auth.rezon.dev/login/callback
During this process, Microsoft generates an **Application (client) ID** for your application; you can find this on the app's **Overview** screen. Make a note of **this value.**

### Create a client's secret
In the recently created application, select Certificates & Secrets

Create a new Client secret, set it to the preferred amount of time (1 year preferred), and copy and save the recently created value.

### Assign Required Permissions
Click on API Permissions -> Add permission -> Microsoft Graph the following permissions (delegated):\

* Directory.Read.All
* User.Read.All
**Please send Rezonate back the following:**
1\. Microsoft Azure AD Domain
2\. Recently Created App Id
3\. Recently Created Secret Value
You can share this information by Opening a ticket with the title **"ADDING SSO TO MY TENANT"** in our [ticket system here](https://rezonate.atlassian.net/servicedesk/customer/portal/1)
# Legal & Terms
This page hold a general overview of Data processing, Subscription Terms & Privacy Policy
**Data Processing Agreement**
{% file src="/files/t7h3WnDUkjquAOw3jbqS" %}
**Subscription Terms**
{% file src="/files/F8PXPoBbIyy6hy3jpSQ4" %}
**Product Privacy Policy**\
\
[**https://www.rezonate.io/product-privacy-policy/**](https://www.rezonate.io/product-privacy-policy/)
# Product Updates
## Rezonate Product Updates
Welcome to Rezonate’s monthly product update page! Here you’ll find a summary of the latest improvements, new capabilities, and fixes we’ve released to enhance your identity security experience.
***
### 📅 December 2024
* ✅ **Expanded Support for Non-Human Identities (NHI)**\
We’ve broadened our visibility and control over Non-Human Identities. This includes better detection of service accounts, automation identities, and improved enforcement of access policies across hybrid and cloud environments.
* 🔗 **Extended Entra Integration**\
Our integration with Microsoft Entra is now deeper and more robust, offering enhanced synchronization, policy coverage, and identity posture insights. This allows for more comprehensive protection of your Entra-connected environments.
* 🤖 **AI Asset Discovery**\
New asset discovery capabilities now identify and map assets related to AI workloads—such as ML pipelines, model endpoints, and AI-specific service identities. This ensures complete visibility and governance over your AI-driven infrastructure.
* 🚀 **Performance and Stability Improvements**\
We’ve rolled out several core optimizations that improve load times, enhance responsiveness, and ensure a smoother, more reliable product experience. Critical bugs affecting UI rendering and alert flow handling have also been resolved.
### 📅 February 2025
* 🔐 **Certificate-Based Authentication for Snowflake**\
We’ve added native support for certificate-based authentication to Snowflake. This enables more secure, keyless connections and aligns with best practices for service-to-service identity management.
* 🧠 **Rewritten Integration Engine**\
Our integration engine has been completely re-architected to detect and surface errors faster and with greater precision. This reduces integration downtime, improves observability, and simplifies troubleshooting across connected systems.
* ⚡ **Significant Okta Collection Performance Boost**\
We’ve dramatically improved the performance of our data collection from Okta. Customers will now experience faster sync times and reduced latency in asset and identity data ingestion—especially in large-scale environments.
### 📅 May 2025
* 🔗 **Major Expansion of Auth0 Integration**\
Our Auth0 integration has been significantly enhanced, providing deeper visibility into tenants, applications, and identity behaviors. Customers can now enforce granular policies and detect risks across a broader range of Auth0 configurations.
* 🚨 **Enhanced Alerting System**\
We’ve revamped the alerting engine to support richer event context, smarter correlation logic, and more customizable workflows. New alert types and filtering options empower teams to respond faster and with greater precision.
* 🤝 **Slack and LinkedIn Authentication Support**\
Rezonate now supports identity linking and authentication for Slack and LinkedIn users. This helps organizations gain visibility into SaaS-based collaboration environments and unify user identities across their cloud footprint.
* 📡 **Expanded User-Facing API Capabilities**\
We’ve extended our public API with new endpoints for querying user identities, activity patterns, and access paths. These enhancements enable deeper integrations into customer SIEM, SOAR, and custom automation flows.